Introduction to Butterfinger Caramel Crunch Bars
When it comes to indulgent treats, Butterfinger Caramel Crunch Bars are in a league of their own. But what makes these bars so utterly irresistible? Let’s dive into some delicious details!
Why are Butterfinger Caramel Crunch Bars an irresistible treat?
Picture this: you take a bite, and the first thing you experience is that signature crunch from the Butterfinger. This candy bar has captured our hearts (and taste buds) for years. The combination of chocolate, peanuts, and a touch of caramel creates a pleasant contrast of textures. And if you’re a fan of sweet and salty flavors, you know how well the rich chocolatiness pairs with the hint of saltiness from crushed peanuts.
Adding caramel into the mix elevates these bars from classic candy to an extraordinary experience. Not only does caramel add gooey sweetness, but it also binds everything together beautifully, keeping all that delightful crunch intact. It’s like a party in your mouth while adding layers of complexity to each bite.
If you’re looking for that perfect afternoon pick-me-up or a dessert for your next gathering, these bars will be the star of the show. They’re incredibly easy to make, versatile enough for customization, and always leave your friends asking for seconds—or even thirds!
And here's an intriguing fun fact: Did you know that the average American consumes around 22 pounds of chocolate each year? This love for chocolate makes treats like Butterfinger Caramel Crunch Bars all the more essential in our lives. Whether you make them for yourself or share them with family and friends, you’re simply giving in to what many consider to be a universal joy.
But let's not forget that making these bars at home means you can control the quality of your ingredients. Opt for organic chocolate, fresher peanuts, or caramel made from scratch to truly elevate your dessert experience.
With simple ingredients and a little time, you can create something spectacular that will leave everyone craving more. Stay tuned as we guide you through the delightful process of making your very own Butterfinger Caramel Crunch Bars!
Ingredients for Butterfinger Caramel Crunch Bars
If you're ready to whip up some Butterfinger Caramel Crunch Bars, you'll want to gather the right ingredients first. These bars are a heavenly blend of crunchy, chocolatey, and caramel goodness that will definitely impress your friends at your next get-together. Let’s dive into what you’ll need!
Essential Ingredients
- Butter: 1 cup of unsalted butter, melted. This is the base for a rich flavor.
- Brown Sugar: 1 cup packed, for that deep, caramel-like sweetness.
- Granulated Sugar: 1 cup, to balance the flavors perfectly.
- Vanilla Extract: 2 teaspoons, an essential for that warm, inviting flavor.
- All-Purpose Flour: 2 cups to provide structure and hold the bars together.
- Baking Powder: 1 teaspoon, to help them rise just a bit.
- Salt: ½ teaspoon, to enhance the flavors.
- Chocolate Chips: 2 cups of semi-sweet or milk chocolate—your choice!
- Butterfinger Candy Bars: About 4-5 bars, chopped to toss into the batter for that crunchy element.
With these ingredients on hand, your journey to making delicious Butterfinger Caramel Crunch Bars will be smooth sailing. For more tips on ingredient selection, check out this resource to ensure you're getting the best quality! Are you excited yet? I know I am!
Preparing Butterfinger Caramel Crunch Bars
If you love the combination of rich chocolate, gooey caramel, and that delightful crunch, you’re in for a treat with these Butterfinger Caramel Crunch Bars. By breaking the process down into easy steps, you’ll be able to impress friends and family with your baking skills. So roll up your sleeves, and let's get started!
Preheat the oven and prepare the baking pan
Before diving into mixing, it's crucial to set the stage for your baking adventure. Preheat your oven to 350°F (175°C). While that’s warming up, grab an 8x8-inch baking pan. Line it with parchment paper to ensure easy removal after baking. This small step makes all the difference and saves you from extra cleanup. Also, you can check out this baking tips guide for more useful tricks!
Make the base mixture
Now it’s time to whip up the delicious base for our Butterfinger Caramel Crunch Bars. In a mixing bowl, combine:
- 1 cup of crushed graham crackers
- ½ cup of melted unsalted butter
- ¼ cup of brown sugar
- A pinch of salt
Stir until everything comes together and the mixture resembles wet sand. The graham crackers will give a nice crunchy texture, while the melted butter adds richness. This mixture is easy to put together and creates a perfect foundation for our bars.
Press the base into the pan
With the mixture ready, it’s time to form the crust. Take your graham cracker base and evenly press it into the bottom of your prepared pan. Use the back of a measuring cup or your fingers to ensure that it’s firmly packed and smooth. An even layer is key here, as it will support the caramel and chocolate later on.
Bake the crust
Place the pan in the preheated oven and bake your crust for about 10-12 minutes, until it's lightly golden. The tantalizing aroma of baked graham crackers will fill your kitchen, heightening your anticipation. Let the crust cool slightly while you prepare the next layer.
Prepare the caramel layer
Time for the crown jewel! You can either use store-bought caramel or make your own from scratch. If you're feeling adventurous, heat:
- 1 cup of caramel bits or squares
- 2 tablespoons of heavy cream (or milk for a lighter version)
Melt this mixture in a microwave-safe bowl, stirring every 30 seconds until silky smooth. If your caramel is too thick, just add a bit more cream to achieve the desired consistency.
Assemble the bars with toppings
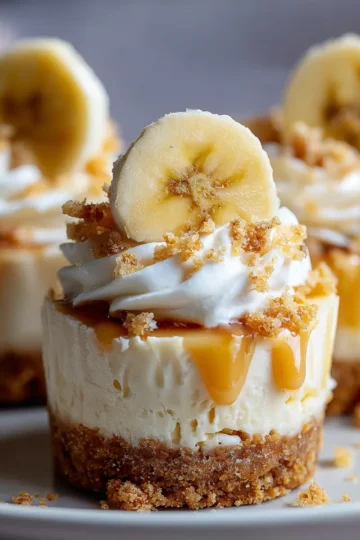
Once your crust has cooled a bit, drizzle or spread the warm caramel layer generously over the graham cracker base. Now comes the fun part—adding toppings! Crumble up a handful of Butterfinger candy bars and sprinkle them over the caramel. For an extra crunch, consider adding:
- Chopped nuts (like peanuts or almonds)
- Sea salt for a sweet-salty balance
This is where you can get creative! Experiment with flavors or stick to the classic candy for that nostalgic taste.
Chill and cut the bars
Finally, let your Butterfinger Caramel Crunch Bars chill in the refrigerator for at least 1-2 hours. This allows everything to set nicely. When you can’t wait any longer, remove the bars from the pan using the parchment paper, and cut them into rectangles. Make sure to use a sharp knife for clean edges.
In summary, preparing Butterfinger Caramel Crunch Bars involves some delightful layers and flavors that are sure to impress. Whether you’re making them for a party or simply indulging yourself, these bars are not just delicious—they're fun to make! Enjoy the process, and don’t hesitate to share your creations with friends or on social media. Happy baking!
Variations on Butterfinger Caramel Crunch Bars
Peanut Butter Butterfinger Caramel Crunch Bars
If you’re a peanut butter lover, adding this rich ingredient to your Butterfinger Caramel Crunch Bars will elevate them even further. Start by mixing a generous scoop of creamy peanut butter into your melted chocolate before drizzling it over the bars. This delightful twist not only enhances the flavor but also complements the crunchy texture. Plus, peanut butter is known for its health benefits, such as protein and healthy fats, making your treat a bit more guilt-free! Don’t forget to sprinkle some crushed peanuts on top for an additional crunch!
Gluten-Free Butterfinger Caramel Crunch Bars
No need to miss out on the deliciousness if you’re gluten-sensitive! Making gluten-free Butterfinger Caramel Crunch Bars is a breeze. Simply substitute traditional graham cracker crumbs with gluten-free options, like crushed gluten-free cookies or oats. Ensure that your chocolate and caramel sauces are also gluten-free by checking labels carefully—many well-known brands offer safe options. Not only will these bars satisfy your sweet tooth, but they’ll also allow everyone to join in on the fun!
For more inspiration, check out this collection of gluten-free recipes here or dive into peanut butter variations here. These tasty options make it easy to experiment and discover new favorites while enjoying your Butterfinger Caramel Crunch Bars. Have you come up with your own twist on this dessert? Share it in the comments!
Cooking Tips and Notes for Butterfinger Caramel Crunch Bars
Making Butterfinger Caramel Crunch Bars is a delightful journey, and a few tips can help you nail that perfect texture and flavor.
Choose Quality Ingredients
The taste of your Butterfinger Caramel Crunch Bars hinges on quality. Opt for real chocolate over a generic brand—your bars will thank you! Look for high-quality caramel, as it can genuinely elevate your dessert’s richness and gooey goodness. Unsure what to buy? Check out expert reviews on sites like Chowhound for recommendations.
Avoid Sticky Situations
When melting caramel, do it slowly over medium heat. This helps prevent burning and keeps the texture smooth. You can add a pinch of salt for that beloved salty-sweet balance. Consider sticking to a silicone spatula to scrape the sides; they make cleanup easier and are less sticky than traditional ones.
Allow for Cooling
Once baked, resist the urge to dive in right away! Let your Butterfinger Caramel Crunch Bars cool completely—this helps them firm up for cleaner cuts.
Store Wisely
These bars can be stored in an airtight container at room temperature for up to a week or in the fridge for about two weeks. When properly stored, they make a quick grab-and-go snack!
Following these pointers not only enhances the flavor but makes for an enjoyable baking experience. Happy baking!
Serving Suggestions for Butterfinger Caramel Crunch Bars
When it comes to enjoying your Butterfinger Caramel Crunch Bars, presentation and pairings can elevate them to an entirely new level. Let’s explore some delightful serving suggestions that will impress your friends and satisfy your sweet tooth.
Pairing with Beverages
To enhance the flavors of your vibrant bars, consider pairing them with:
- Coffee or Espresso: The rich, bold flavors of coffee complement the sweetness of the bars, creating a perfectly balanced experience.
- Milk: There’s nothing like a classic! A glass of cold milk can help cut through the sweetness, making each bite even more enjoyable.
Create a Dessert Platter
Consider serving your Butterfinger Caramel Crunch Bars alongside:
- Fresh Berries: The tartness of strawberries or raspberries contrasts beautifully with the bars' sweetness.
- Ice Cream: A scoop of vanilla or chocolate ice cream can take your dessert experience to new heights.
Personal Touches
Feel free to get creative! Try adding a sprinkle of sea salt on top for a savory twist or drizzling a bit of dark chocolate for that extra indulgence. You can also check out Food Network for more inspiration.
Remember, the goal is to enjoy your delicious creation while adding touches that make it uniquely yours! Happy serving!
Time Breakdown for Butterfinger Caramel Crunch Bars
Preparation Time
Creating your Butterfinger Caramel Crunch Bars is a fun, engaging process that begins with about 15 minutes of preparation. During this time, gather your ingredients like crushed Butterfinger candy, graham cracker crumbs, and gooey caramel. Make sure you have all your tools ready, so you can dive right in!
Cooking Time
Once everything is prepped, you’ll spend around 25 minutes baking. This allows the ingredients to meld beautifully, creating that delightful crunch and rich flavor. If you’re like me, this will also be the perfect moment to sneak a taste of the batter—quality control is essential!
Total Time
In just about 40 minutes, you can whip up these delightful Butterfinger Caramel Crunch Bars. It’s an enjoyable kitchen adventure that’s well worth every second, ensuring you have a scrumptious treat ready to share (or indulge in all by yourself). Check out more tips on baking times here to perfect your dessert-making skills.
Now, who’s ready to get started?
Nutritional Facts for Butterfinger Caramel Crunch Bars
Understanding the nutritional facts of your favorite treats can help you enjoy them mindfully. Here's an overview of what's in the delightful Butterfinger Caramel Crunch Bars:
Calories
One serving contains about 200 calories. This makes it a great option for a sweet afternoon indulgence without completely derailing your daily caloric intake.
Sugars
This delicious snack is on the sweeter side, with approximately 20 grams of sugar per serving. While it satisfies your sweet tooth, balance is key!
Total Fat
Each bar has around 10 grams of total fat, contributing to its rich and satisfying taste. It's essential to enjoy these with moderation, especially if keeping an eye on your fat intake.
For more detailed nutritional guidelines, check out sources like the FDA or the USDA FoodData Central for all your nutritional queries. Remember, enjoying Butterfinger Caramel Crunch Bars is all about balance and knowing what works for your dietary lifestyle!
FAQs about Butterfinger Caramel Crunch Bars
Can I make these bars ahead of time?
Absolutely! Butterfinger Caramel Crunch Bars are perfect for planning ahead. You can prepare them a day or two in advance and let them sit at room temperature. This helps all the flavors meld beautifully. Just make sure to wrap them tightly to prevent any drying out. They taste even better after a short rest!
What’s the best way to store Butterfinger Caramel Crunch Bars?
Storage is key to keeping your Butterfinger Caramel Crunch Bars fresh and delicious. Place them in an airtight container at room temperature for up to a week. If you want to extend their life, consider refrigerating them. Just remember to let them come to room temperature before serving, as the textures are best when they’re a bit softer. For longer storage, they can be frozen for up to three months; just be sure to layer them with parchment paper to avoid sticking.
Can I use other types of chocolate for the topping?
Certainly! While the classic Butterfinger Caramel Crunch Bars shine under a rich chocolate glaze, feel free to get creative. Dark chocolate adds a delightful twist if you're looking for a more intense flavor. White chocolate, on the other hand, offers a sweet, buttery contrast that works beautifully with caramel. Just melt your chosen chocolate as you would normally, and drizzle it over the cooled bars. Explore flavors like milk chocolate or even peanut butter chocolate for a fun twist too!
For more tips on variations and techniques, check out resources like Serious Eats for further culinary inspiration. Enjoy your baking adventure!
Conclusion on Butterfinger Caramel Crunch Bars
In summary, Butterfinger Caramel Crunch Bars are not just a treat; they’re an experience. With their combination of creamy caramel, crunchy layers, and that iconic Butterfinger flavor, they’re the perfect indulgence for both a sweet craving or a festive gathering.
Making these bars at home also means you can control the sweetness and ingredients. Plus, sharing them can elevate any event—whether it’s a cozy night in or a fun get-together with friends. So, why not give it a try? Your taste buds will thank you. For more sweet delights, check out recipes on Taste of Home or Serious Eats for inspiration!
Print
Butterfinger Caramel Crunch Bars: Indulge in a Sweet Treat
Indulge in the sweet and crunchy goodness of Butterfinger Caramel Crunch Bars, a perfect dessert for any occasion.
- Total Time: 40 minutes
- Yield: 16 bars
Ingredients
- 1 cup Butterfinger candy bars, crushed
- ½ cup unsalted butter
- 1 cup granulated sugar
- 1 cup sweetened condensed milk
- 2 cups graham cracker crumbs
- 1 cup semi-sweet chocolate chips
- ½ cup chopped nuts (optional)
Instructions
- Preheat the oven to 350°F (175°C).
- In a saucepan, melt the butter and sugar together over medium heat until combined.
- Stir in the sweetened condensed milk and bring to a simmer.
- Add the graham cracker crumbs and mix well.
- Fold in the crushed Butterfinger candy bars.
- Spread the mixture into a greased baking dish.
- Sprinkle the chocolate chips and nuts on top.
- Bake for 20-25 minutes until set and golden brown.
- Allow to cool before cutting into bars.
Notes
- For extra flavor, consider adding a pinch of salt to the butter and sugar mixture.
- These bars can be refrigerated for a firmer texture.
- Prep Time: 15 minutes
- Cook Time: 25 minutes
- Category: Dessert
- Method: Baking
- Cuisine: American
- Diet: Vegetarian
Nutrition
- Serving Size: 1 bar
- Calories: 250
- Sugar: 18g
- Sodium: 150mg
- Fat: 12g
- Saturated Fat: 7g
- Unsaturated Fat: 4g
- Trans Fat: 0g
- Carbohydrates: 30g
- Fiber: 1g
- Protein: 3g
- Cholesterol: 25mg


