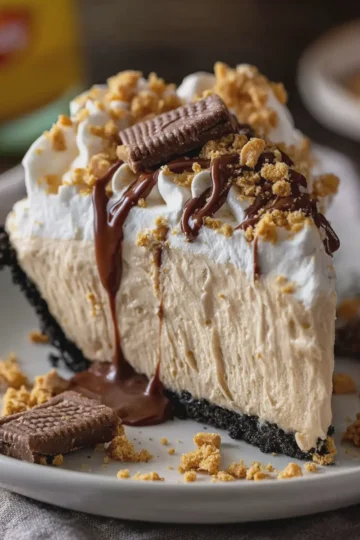
Introduction to Buster Bar Ice Cream Cake
The nostalgic appeal of Buster Bar Ice Cream Cake
If you’ve ever relished the joy of a summer evening spent at a beloved ice cream parlour, chances are, you might remember Buster Bars. This delightful combination of creamy ice cream, chocolate fudge, and crunchy peanuts holds a special place in many hearts. The Buster Bar Ice Cream Cake takes this childhood treat to a whole new level, transforming it into a sliceable dessert that’s perfect for any occasion. Whether it’s a birthday bash, a family gathering, or just a cozy night in, this dessert captures all the nostalgic flavors we love, making it ideal for sharing those moments that matter.
Why making it at home is a game changer
Crafting your own buster bar ice cream cake at home isn't just a fun activity; it’s a game changer for several reasons:
- Customization: You can tailor every layer to fit your unique taste. Want extra chocolate? Go for it. Prefer a peanut-free version? Swap ingredients as you like!
- Quality Control: Making it yourself allows you to choose high-quality ingredients, ensuring that your cake is as delicious as it is wholesome. You can find more on quality ingredient selection at Food Network.
- Cost-Effective: Rather than splurging on store-bought versions, creating this cake at home can save you a good chunk of change. Plus, you can create multiple servings to share with friends!
Moreover, imagine the feeling of pulling a gorgeous cake out of the freezer, especially after a long day. It not only impresses your guests but also serves as a delightful reward for yourself. Who wouldn’t want to whip up a treat that evokes cherished memories and tastes divine?
In conclusion, the Buster Bar Ice Cream Cake is more than just a dessert; it’s a celebration of flavors and memories. So gather your ingredients, invite some friends over, and dive into the delightful world of homemade dessert-making. You won’t regret it!

Ingredients for Buster Bar Ice Cream Cake
Creating a buster bar ice cream cake is a delightful journey into the realm of frozen treats. Before you gather your baking gear, let’s look at the essential components you’ll need for this stunning dessert.
Key Ingredients
- Ice Cream: Choose your favorite flavors—think vanilla, chocolate, or even cookie dough for a fun twist.
- Chocolate Sauce: A rich, gooey chocolate sauce will elevate your cake and add a decadent layer that’s hard to resist.
- Peanut Butter: Creamy peanut butter adds a delightful nutty flavor that complements the sweetness of the ice cream beautifully.
- Crushed Nuts: Consider using a mix of peanuts and almonds for a satisfying crunch.
- Oreo Cookies or Graham Crackers: These will form the cake's base layer. Crush them up and mix with some melted butter for a tasty crust.
- Whipped Cream: For that finishing touch, top it all off with freshly whipped cream to lend a lightness to the dish.
If you're curious about the health benefits of nuts, check out this informative article from the Mayo Clinic. Now, who’s ready to get baking?
Step-by-step Preparation of Buster Bar Ice Cream Cake
Creating a Buster Bar Ice Cream Cake is a fun and satisfying project that guarantees an impressive dessert for any gathering. Here's a simple step-by-step guide to help you create this delicious treat, ensuring every layer is packed with flavor and satisfaction.
Gather your ingredients
Before diving into the layering magic, let’s make sure you have everything on hand. Here’s what you’ll need:
- 24 chocolate sandwich cookies (like Oreos)
- ½ cup unsalted butter, melted
- 1 quart vanilla ice cream (softened slightly)
- 1 cup dry roasted peanuts (chopped)
- 1 cup chocolate fudge sauce (store-bought or homemade)
- 8 ounces whipped topping (like Cool Whip)
- Optional: extra peanuts or chocolate syrup for garnish
You can find great deals on these ingredients at your local grocery store or online. If you're curious about chocolate or ice cream brands, check out this guide.
Prepare the chocolate sandwich cookie crust
First up is the crust, which is the heart of your cake. Crushing cookies is quite therapeutic! Grab those chocolate sandwich cookies and crush them into fine crumbs using a food processor or a zip-top bag and a rolling pin.
- Combine the cookie crumbs with the melted butter in a bowl until it resembles wet sand.
- Press this mixture evenly into the bottom of a 9-inch springform pan. Make sure it's compact to form a sturdy base.
Pop this into the freezer for about 10 minutes while you prepare the next layer.
Layer the vanilla ice cream
Next, it’s time to layer in that rich, creamy vanilla ice cream. Here’s the secret: Make sure your ice cream is softened enough to spread easily, but not melted!
- Take about half of your softened ice cream and spread it evenly over the cookie crust.
- Use a spatula to create a smooth layer.
Add the dry roasted peanuts
Now, who doesn’t love a bit of crunch? That’s where the dry roasted peanuts come in.
- Sprinkle half of the chopped dry roasted peanuts over the vanilla ice cream layer.
- Gently press them down so they are nestled into the ice cream.
This layer of peanuts not only adds texture but also complements the flavors beautifully, reminiscent of those classic Buster Bars.
Drizzle on the fudge sauce
Let’s indulge our sweet tooth!
- Pour half of your chocolate fudge sauce over the peanuts.
- Use a spatula or the back of a spoon to spread it evenly.
The richness of the fudge sauce adds a luscious touch that makes this cake incredibly irresistible.
Top with whipped topping and garnish
Now, let’s get that fluffy topping on!
- Spread the whipped topping over the fudge layer, smoothing it out to cover completely.
- If you're feeling extra festive, sprinkle more chopped peanuts or drizzle more fudge sauce on top as a garnish.
This is your chance to get creative!
Freeze until firm and ready to serve
Finally, it’s time to chill.
- Cover the pan with plastic wrap or a lid, and pop it in the freezer for at least 4 hours, or overnight if you can wait that long.
Once it’s frozen solid, you can remove the sides of the springform pan. Slice it like a cake, and watch everyone’s faces light up!
This Buster Bar Ice Cream Cake is always a hit, and you’ll be the superstar of your next gathering. Enjoy every creamy, crunchy, and chocolaty layer!
If you want more dessert inspiration or tips on how to host the perfect get-together, feel free to check out this resource. Happy baking!

Variations on Buster Bar Ice Cream Cake
When it comes to buster bar ice cream cake, the possibilities are nearly endless! Here are a few delightful variations to consider that will elevate your dessert experience.
Peanut Butter Twist
If you’re a peanut butter lover, this twist is calling your name. Simply replace some of the ice cream layers with your favorite peanut butter-flavored ice cream or swirl in creamy peanut butter between layers. For extra crunch, sprinkle chopped peanuts or mini chocolate-covered pretzels in between. This combination of flavors is sure to make your taste buds sing!
Chocolate Fudge Variation
For a rich, indulgent experience, you can’t go wrong with a chocolate fudge variation. Opt for chocolate ice cream instead of vanilla, and add a layer of hot fudge sauce between the ice cream layers. Top your masterpiece with a generous drizzle of fudge and some crushed chocolate cookies for a decadently delicious finish. Imagine the deep, chocolatey goodness melting in your mouth—truly heavenly!
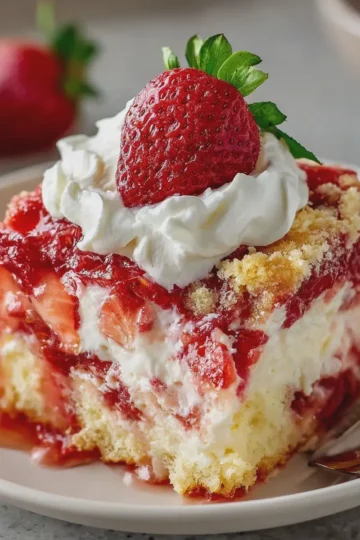
Fruit-Infused Ice Cream Layer
Why not brighten up your buster bar ice cream cake with a fruit-infused layer? Use strawberry, mango, or raspberry sorbet for a refreshing contrast to the creamy ice cream layers. You can also blend fresh fruit into your ice cream base before freezing. This light and fruity twist will not only impress your guests but also add a healthy kick to your dessert.
Feel free to mix and match these ideas based on your personal preferences. Whether you choose to stick to classic flavors or explore unique combinations, each variation of buster bar ice cream cake is an opportunity to create something memorable. Looking for more inspiration? Check out Food Network for endless dessert ideas and tips!
Cooking Tips and Notes for Buster Bar Ice Cream Cake
Choosing the Right Type of Ice Cream
When making your buster bar ice cream cake, selecting the right ice cream is crucial for that perfect texture and flavor balance. Opt for a creamy, full-fat ice cream for the best results—you'll notice the difference in taste and scoopability. Popular choices include chocolate or vanilla, but don't hesitate to experiment with flavors like caramel or cookie dough. For a fun twist, consider mixing in bites of your favorite candies or cookies!
For expert insights on ice cream varieties, check out this guide on ice cream types.
Ensuring the Cake Slices Cleanly
One common challenge with ice cream cakes is slicing them neatly. To ensure that your buster bar ice cream cake slices easily, let it sit at room temperature for about 10 minutes before serving. A warm knife will glide through the layers without turning your masterpiece into a melty mess. Additionally, you can dip your knife in warm water and wipe it dry between cuts for clean slices.
These little tricks will enhance your presentation and impress your guests!

Serving Suggestions for Buster Bar Ice Cream Cake
Pairing with Fresh Fruits
One delightful way to elevate your Buster Bar Ice Cream Cake is by pairing it with freshly cut fruits. Think ripe strawberries, juicy blueberries, or even tangy pineapples. The sweetness of the cake complements the tartness of the fruit beautifully, creating a balanced dessert experience.
- Strawberries: Their sweet, slightly tart flavor makes them a classic option.
- Bananas: Their creamy texture pairs wonderfully with ice cream.
- Mango: This tropical fruit adds a refreshing twist.
For added flair, consider drizzling a bit of honey or a sprinkle of mint leaves on top of your fruit dish. Not only does this enhance the visual appeal, but it also adds a touch of gourmet to your dessert.
Serving Alongside Warm Desserts
Imagine the magic of serving a slice of Buster Bar Ice Cream Cake alongside a warm dessert like chocolate lava cake or freshly baked cookies. The warm and cold combination creates an inviting contrast that your guests will love.
- Chocolate Lava Cake: The rich, gooey center is a match made in heaven with ice cream.
- Chocolate Chip Cookies: Classic comfort food that enhances the indulgence of your cake.
A scoop of vanilla or caramel sauce can tie it all together, making your dessert spread a standout for any occasion.
Incorporating these suggestions can really take your Buster Bar Ice Cream Cake experience to another level! Want to learn more? Check out Food & Wine for tips on dessert pairings that impress.
Time Breakdown for Buster Bar Ice Cream Cake
When you’re craving something sweet and satisfying, this Buster Bar Ice Cream Cake is a show-stopper! Here’s how your time will break down for creating this fantastic dessert.
Prep Time
You'll need about 20 minutes for the prep work. Gathering your ingredients and assembling the cake is straightforward and allows you to unleash your creativity!
Chill Time
Patience is key! After prepping, let your cake chill for at least 4 hours, or ideally overnight. This ensures that all those amazing flavors meld beautifully, creating a rich taste experience.
Total Time
In total, you’re looking at roughly 4 hours and 20 minutes. But don’t worry; most of that time is just waiting for the cake to chill. You can easily work on other tasks while it firms up!
Ready to impress your friends with this delicious Buster Bar Ice Cream Cake? Your taste buds will thank you! For more detailed techniques on dessert preparation, check out resources like Serious Eats for expert tips and tricks.
Nutritional Facts for Buster Bar Ice Cream Cake
Calories per serving
When it comes to enjoying a slice of Buster Bar Ice Cream Cake, understanding its caloric content is vital for mindful indulgence. Each slice typically packs around 300 calories. While it’s not the lightest dessert option, the burst of flavor and nostalgia this cake brings makes it well worth the occasional treat.
Other key nutritional details
Beyond calories, the buster bar ice cream cake has a mix of nutritional components to consider:
- Fat: Approximately 15g, including a blend of saturated and unsaturated fats.
- Sugars: Around 25g, providing that delightful sweetness we crave.
- Protein: About 4g per serving, giving you a little boost.
For more detailed nutritional breakdowns, check out Nutritionix for personalized insights that suit your dietary needs. Remember, balance is key! Enjoying this cake as part of a varied diet can fit into a healthy lifestyle. How do you like to enjoy yours?
FAQs about Buster Bar Ice Cream Cake
If you’re itching to whip up a Buster Bar Ice Cream Cake, you might have some questions swirling in your mind. Don't worry; we’ve got you covered with these frequently asked questions!
Can I make this cake in advance?
Absolutely! In fact, making a Buster Bar Ice Cream Cake in advance is one of the best ways to ensure it’s ready when you need it. You can assemble the cake a day or two prior to serving. Just remember to cover it well with plastic wrap or aluminum foil to keep it fresh, and store it in the freezer until you’re ready to dig in!
How long will it keep in the freezer?
When stored properly, your Buster Bar Ice Cream Cake can last in the freezer for about 1 to 2 weeks. However, for the best taste and texture, try to enjoy it within a week. After that, the quality may start to decline, especially if you have any mix-ins that don’t freeze well.
What can I substitute if I don’t have certain ingredients?
Getting creative in the kitchen is key! Here are some easy substitutes:
- Ice Cream: Use any flavor you love. Vanilla, chocolate, or even a fruity sorbet can be delightful!
- Toppings: Don’t have chocolate or peanut toppings? Opt for crushed cookies, seasonal fruit, or even crushed nuts.
- Base Layer: If you don’t have graham crackers, nearly any type of cookie will work just fine.
For a deep dive into ingredient substitutions, check out resources like TasteofHome.com for lots of creative ideas!
Don’t hesitate to experiment, as that's part of the fun of baking! Now, go ahead and create your own version of this delicious cake!
Conclusion on Buster Bar Ice Cream Cake
An Invitation to Try This Delicious Dessert at Home
If you've been tempted by the idea of creating your own Buster Bar ice cream cake, now is the perfect time to dive in! This delightful treat combines layers of rich ice cream and crunchy goodies, making it an unforgettable dessert for any occasion. Cooking can be as simple as following a recipe, yet it allows you to add your own twist. Trust me, you’ll love the satisfied smiles when you share this masterpiece with friends and family.
Savoring the Joy of Homemade Desserts
In a world full of store-bought options, there's something heartwarming about homemade desserts. Each slice of your Buster Bar ice cream cake will bring back memories, and you’ll cherish the moments spent baking with loved ones. Remember, dessert is not just about satisfying your sweet tooth; it’s about creating connections and enjoying the process. So, gather your ingredients, roll up your sleeves, and experience the joy of making your own delicious treats.
For further inspiration, consider checking out Baking Basics for tips on mastering dessert techniques!
Print
Buster Bar Ice Cream Cake: The Indulgent Treat You’ll Love
Buster Bar Ice Cream Cake is the perfect indulgent treat that combines your favorite flavors in a delightful dessert.
- Total Time: 4 hours 30 minutes
- Yield: 12 servings
Ingredients
- 1 ½ cups crushed chocolate sandwich cookies
- ½ cup unsalted butter, melted
- 1 quart vanilla ice cream, softened
- 1 quart chocolate ice cream, softened
- 1 cup hot fudge sauce
- ½ cup chopped nuts
- 1 ½ cups whipped topping
- ¼ cup chocolate shavings
Instructions
- Preheat your oven to 350°F (175°C).
- In a bowl, combine crushed cookies and melted butter.
- Press the mixture into the bottom of a 9x13 inch pan.
- Bake for 10 minutes and let cool.
- Spread softened vanilla ice cream over the cooled crust.
- Drizzle hot fudge sauce over the vanilla layer.
- Spread softened chocolate ice cream over the fudge layer.
- Top with whipped topping and sprinkle with nuts and chocolate shavings.
- Freeze for at least 4 hours before serving.
Notes
- For a richer flavor, use premium ice cream.
- Let the cake sit at room temperature for a few minutes before slicing for easier serving.
- Prep Time: 20 minutes
- Cook Time: 10 minutes
- Category: Dessert
- Method: Baking and Freezing
- Cuisine: American
- Diet: Vegetarian
Nutrition
- Serving Size: 1 slice
- Calories: 350
- Sugar: 25g
- Sodium: 180mg
- Fat: 20g
- Saturated Fat: 10g
- Unsaturated Fat: 8g
- Trans Fat: 0g
- Carbohydrates: 40g
- Fiber: 2g
- Protein: 5g
- Cholesterol: 30mg