Introduction to Peanut Butter Balls
The Love for Homemade Treats
There's something inherently comforting about homemade treats. Whether it’s freshly baked cookies or no-bake delights like peanut butter balls, they evoke memories of cozy kitchens and warm gatherings. In a world where convenience often trumps cherished traditions, creating something from scratch reaffirms our ability to enjoy life’s simple pleasures. Not only are homemade goodies delicious, but they also provide an opportunity for creativity and personalization. Have you ever thought about how the flavors and textures can be tailored to match your taste? From crunchy peanut butter to silky smooth variations, the options are endless.
Moreover, making your own treats can be a fun activity to enjoy with friends or family on the weekends, and it's a perfect opportunity to bond over shared experiences. If you're interested in exploring more about the benefits of homemade treats, resources like Food52 offer a wealth of information and inspiration.
Why Peanut Butter Balls Are a Game-Changer
Let’s be honest: when it comes to easy, satisfying snacks, peanut butter balls truly hit the mark. They are simple to prepare, require minimal ingredients, and offer a delightful blend of flavors and textures. With just a handful of pantry staples, you can whip up a batch in no time. Here’s why these little gems are such a game-changer:
- Versatile Nutrition: Packed with protein from peanut butter and healthy fats, these balls can fuel your day. Whether you need a quick breakfast or a post-workout snack, they fit the bill.
- Customizable: Don’t like certain ingredients? Swap them out! Use almond butter instead or add your favorite superfoods. The possibilities are endless!
- No-Bake Convenience: Who has time for lengthy baking sessions? With peanut butter balls, all you need to do is mix, roll, and chill. It’s that easy!
Imagine reaching into your fridge for a sweet pick-me-up that’s satisfying and good for you. That’s the beauty of peanut butter balls. They prove that healthy snacking doesn’t have to be boring. Plus, the satisfaction of finishing a batch you made yourself? Priceless. So, grab your apron and get ready to discover your new favorite snack! For more inspiration on simple snacks, check out Healthline.
Ingredients for Peanut Butter Balls
Creating delicious peanut butter balls is simple and satisfying! Here’s what you’ll need to whip up these delightful treats.
Key Ingredients You Need
To get started on your peanut butter journey, gather these essentials:
- Peanut Butter: Choose creamy or crunchy based on your texture preference. Natural peanut butter is a great option, as it’s free from added sugars and oils.
- Oats: Old-fashioned rolled oats add a hearty texture and help bind everything together.
- Honey or Maple Syrup: For sweetness and a touch of moisture, these are perfect options. They provide a natural sweetness without the refined sugar.
- Chocolate Chips: Semi-sweet or dark chocolate offers a rich contrast to the nutty flavor.
For detailed nutritional information, you might check out Healthline.
Optional Add-ins for Extra Flavor
Feeling adventurous? Here are some great add-ins to elevate your peanut butter balls:
- Chopped Nuts: Add walnuts, almonds, or pecans for an extra crunch.
- Coconut Flakes: Unsweetened coconut can give your balls a tropical twist.
- Protein Powder: A scoop of your favorite protein can boost the nutritional value, perfect for a post-workout snack.
Experimenting with these ingredients makes your peanut butter balls uniquely yours! What’s your secret ingredient?
Step-by-Step Preparation of Peanut Butter Balls
Making peanut butter balls is not just a cooking task; it’s a delightful experience that brings a little sweetness into your day. They are perfect for snacking, potlucks, or simply treating yourself! So, let’s dive into the step-by-step preparation process that will make you a peanut butter ball pro in no time.
Gather Your Ingredients
Before we get our mixing bowls dirty, let’s make sure we have everything we need. Here’s what you’ll need:
- 1 cup of creamy peanut butter: Feel free to use natural peanut butter for a healthier twist.
- ½ cup of unsalted butter, softened: This enhances the texture and flavor.
- 2 cups of powdered sugar: This will add that necessary sweetness.
- 1 teaspoon of vanilla extract: For that extra depth of flavor.
- 1 cup of semi-sweet chocolate chips: The perfect topping!
- A pinch of salt: To balance out the sweetness.
Now that you have all your ingredients ready, it’s time to start creating these sweet treats!
Cream the Peanut Butter and Butter
In a mixing bowl, combine the creamy peanut butter and the softened unsalted butter. Using an electric mixer, beat them on medium speed until the mixture is smooth and fluffy. This step is crucial; it establishes the creamy texture you'll love in each bite. If you don’t have an electric mixer, a wooden spoon and some elbow grease will work, too!
Incorporate the Powdered Sugar
Once the peanut butter and butter are well blended, slowly add in the powdered sugar. It might get a bit messy, so take this step gradually! Mix until your ingredients are well-combined and the consistency resembles dough. You can also add the vanilla extract and a pinch of salt at this stage to kick up the flavor.
Did you know that powdered sugar has a unique role in creating a smooth texture? Unlike granulated sugar, its fine texture prevents grittiness in the final product.
Roll into Balls
Now comes the fun part! Using your hands, take a small amount of the peanut butter mixture and roll it into a ball about the size of a tablespoon. Don’t worry about making them perfect; a little variation in size gives them character. Place these little delights on a baking sheet lined with parchment paper.
Chill for That Perfect Firmness
Pop your tray of peanut butter balls into the refrigerator for about 30 minutes. This chilling step is vital because it helps the balls firm up, making them easier to handle when we dip them in chocolate.
Melt the Chocolate Coating
While your peanut butter balls are chilling, it’s time to melt the chocolate. You can either use a microwave-safe bowl or a double boiler. Heat the semi-sweet chocolate chips in short bursts in the microwave, stirring every 30 seconds until fully melted. If you're using a double boiler, be cautious not to let any water get into the chocolate, as this can cause it to seize up.
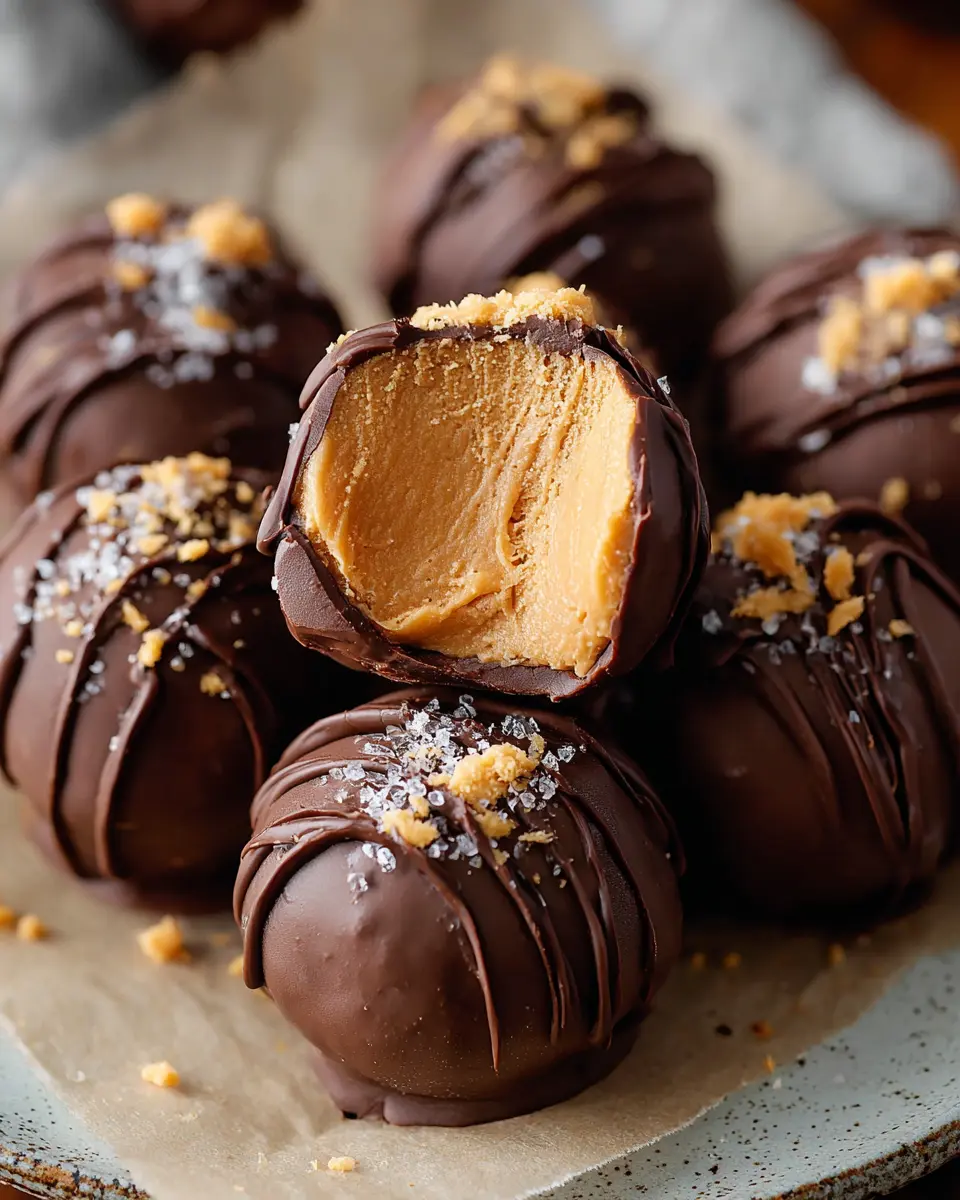
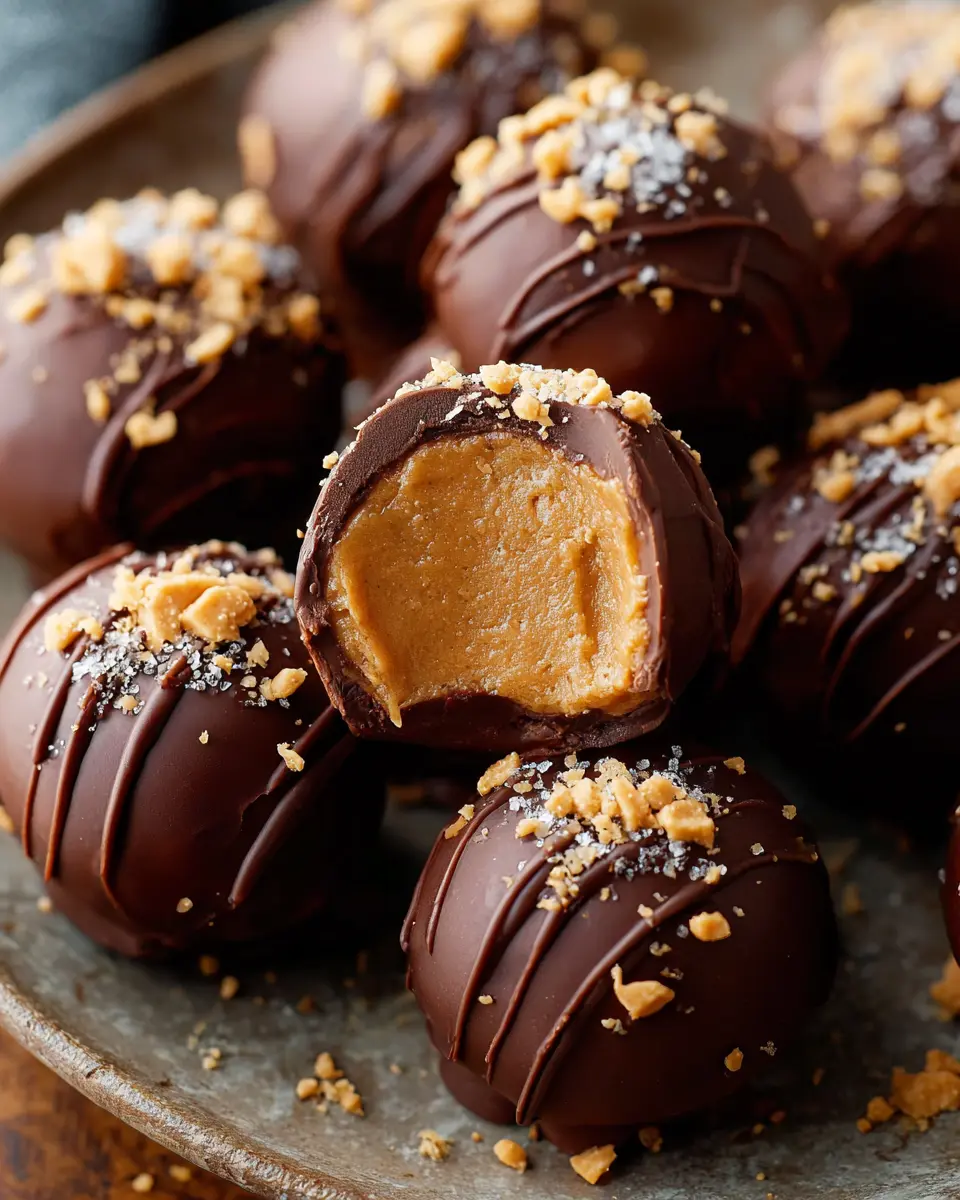
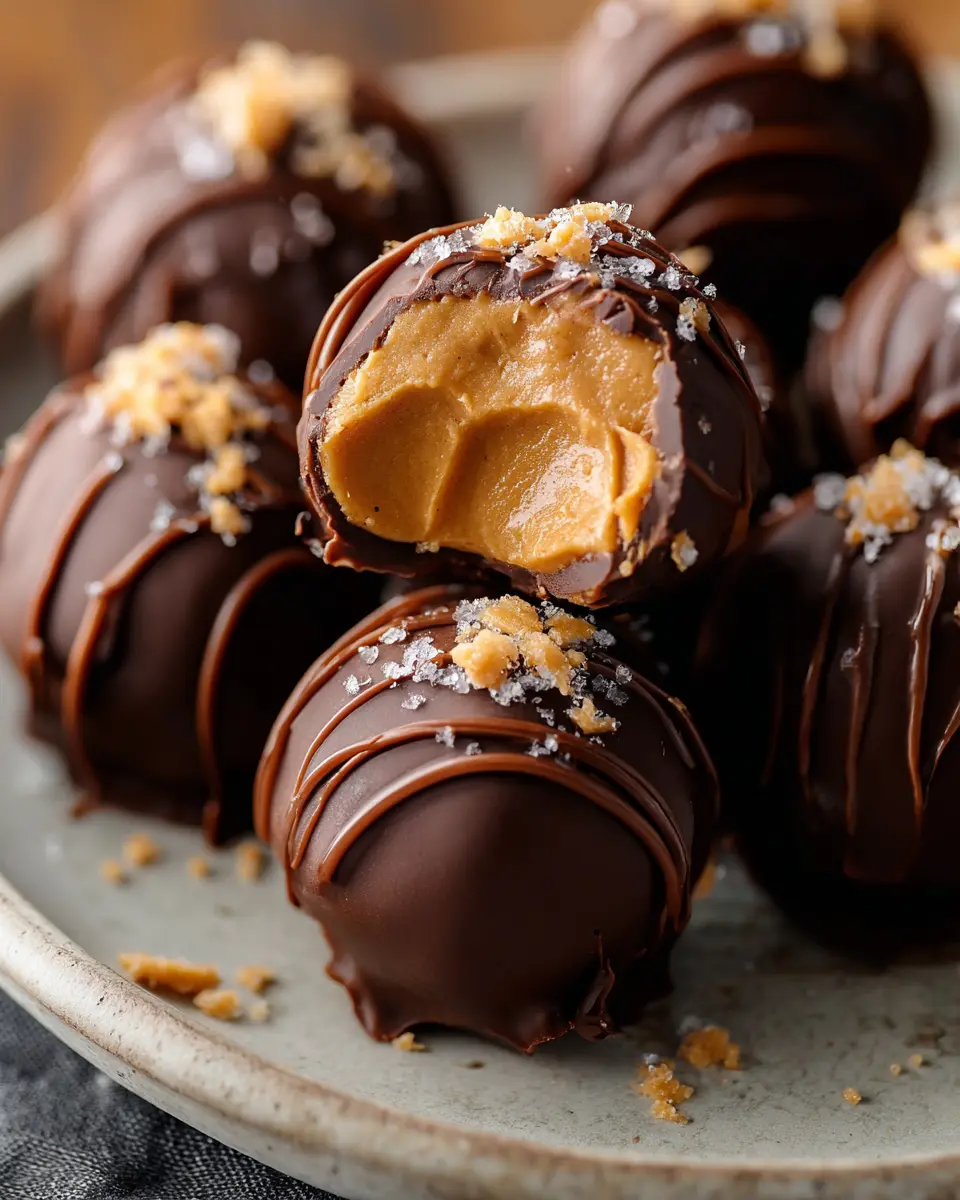
Dip and Set Your Peanut Butter Balls
Now that your chocolate is ready, take your chilled peanut butter balls out of the fridge. Using a fork, dip each ball into the melted chocolate, ensuring they are fully coated. Transfer them back onto the baking sheet to set. If you want to be fancy, sprinkle a little sea salt on top or drizzle some extra melted chocolate over them for a professional finish.
Once they are set, refrigerate them for about 15 minutes to harden the chocolate completely.
And there you have it: your very own delicious peanut butter balls! Perfect for sharing (or not!). They’ll last about a week in the fridge—if they last that long! Please share your experiences and let me know how much you love these little bites of heaven!
For more delightful recipes similar to this one, check out Serious Eats for some inspiration. You can always find variations on classic treats, taking them to the next level!
Variations on Peanut Butter Balls
Peanut butter balls are incredibly versatile, and with a few creative tweaks, you can elevate them to suit your taste and nutritional needs. Let’s explore some fun variations!
Peanut Butter Balls with Protein Powder
If you’re looking to amp up the protein in your peanut butter balls, simply add a scoop of your favorite protein powder. This not only enhances the nutritional value but also gives them a delightful texture. Options like whey, casein, or plant-based protein work wonders. Mix in a little extra honey or maple syrup to balance the flavor, and you have a post-workout snack that keeps you energized.
Chocolate-Covered vs. White Chocolate
The age-old debate: should you go for rich, decadent chocolate or the sweetness of white chocolate? Why not both? Half of your peanut butter balls can be dipped in dark chocolate for a rich indulgence, while the other half can be coated in white chocolate for a creamy contrast. This allows you to cater to various taste preferences—plus, they look stunning on a party platter!
Nutty Additions: Incorporating Nuts or Seeds
Adding a crunchy element can take your peanut butter balls to the next level. Consider mixing in chopped almonds, walnuts, or sunflower seeds for a delightful texture. These ingredients not only boost the flavor but also provide healthy fats and extra protein. Toss in some chia or flax seeds for additional nutritional benefits. It’s an easy way to make your snack not only tasty but even more satisfying.
Experimenting with these variations will keep your snack game exciting. After all, who said healthy treats can't be fun? If you're looking for more creative ideas, check out resources like Nutrition.gov for additional nutritious snack inspiration.
Cooking Tips and Notes for Peanut Butter Balls
How to avoid sticky dough
To keep your peanut butter balls from becoming too sticky, make sure to measure your ingredients accurately. Using natural peanut butter can sometimes lead to a runny mixture, so consider adding a bit more powdered sugar or rolled oats to achieve the right consistency. Also, chilling the dough for about 30 minutes before rolling can help significantly!
Perfecting the chocolate coating
For the ultimate chocolate coating, opt for high-quality chocolate chips or melting chocolate. If you find the chocolate too thick for dipping, adding a teaspoon of coconut oil can create a smoother, more pourable consistency. Try using a fork to dip the peanut butter balls—it creates that delightful drizzle effect that not only looks appealing but can also make cleanup easier.
Storage tips for freshness
To keep your peanut butter balls fresh, store them in an airtight container in the refrigerator. They’ll last for up to two weeks, but you can also freeze them for longer storage. Just place them in a single layer in a freezer-safe container, and you’ll have a delicious, quick treat ready to go whenever the craving hits!
For more info on proper food storage methods, check out this helpful guide from the USDA.
Serving Suggestions for Peanut Butter Balls
Pairing with Fruits or Snacks
Elevate your peanut butter balls experience by pairing them with fresh fruits! Think about serving them alongside sliced apples, bananas, or strawberries for a delightful contrast in flavor and texture. The sweetness of these fruits complements the rich, creamy profile of your peanut butter balls, making for a satisfying snack. You could even drizzle a little honey or maple syrup over the fruit to add a touch of sweetness.
Consider creating a colorful platter with a variety of snacks, including whole grain crackers and carrots, to add some crunch. Looking for more ideas? Check out this guide on healthy snack pairings.
Creative Ways to Serve at Parties
When it comes to entertaining, peanut butter balls can shine as an eye-catching centerpiece. Arrange them on a decorative platter and sprinkle with crushed nuts or coconut for that extra flair. You can also get a bit whimsical by serving them on skewers, perhaps alternating layers with banana slices or marshmallows.
For a theme party, why not create a DIY peanut butter ball station? Provide toppings like chia seeds, sprinkles, or dark chocolate chips for guests to customize their own treats. It'll spark conversations and keep everyone engaged. Don’t forget to check out some party planning tips for more inspiration!
Time Breakdown for Peanut Butter Balls
Preparation Time
Getting started on your delicious peanut butter balls isn’t a lengthy process—just about 15 minutes should do the trick. You’ll want to gather all your ingredients, which usually include peanut butter, oats, honey, and chocolate chips. Mixing them together can be an enjoyable affair, almost like creating your own little masterpiece!
Chilling Time
Patience is key here! Once your mixture is ready, you’ll want to chill it in the refrigerator for at least 30 minutes. This waiting period allows the flavors to meld beautifully and firms up the mixture, making it easier to roll into those delightful balls.
Total Time
In total, you’re looking at about 45 minutes from start to finish. In less than an hour, you can have a delicious snack ready to fuel your day. For more culinary inspiration, check out sources like Bon Appétit or Serious Eats for additional tips and tricks. Happy snacking!
Nutritional Facts for Peanut Butter Balls
When you're craving a nutritious snack that doesn’t compromise on taste, peanut butter balls are an excellent choice. Let’s break down their nutritional profile to see why they fit so well into a healthy lifestyle.
Calories per serving
Each serving of peanut butter balls typically contains around 100 calories. This makes them a fantastic option for a quick energy boost without overindulging.
Protein content
One of the standout features of peanut butter balls is their protein content. With about 4-5 grams of protein per serving, they can help keep you full and satisfy post-workout hunger. For more on the benefits of protein, check out this article on healthline.com.
Sugar content and adjustments
You might be wondering about the sugar content. With a standard recipe, you can expect about 3-4 grams of sugar per ball. If you're looking to lower the sugar, consider replacing sweeteners with natural options like mashed bananas or omitting added sugars altogether. It’s a simple way to make your peanut butter balls even healthier without sacrificing taste!
For more tips on nutritional adjustments, feel free to explore choosemyplate.gov.
FAQs about Peanut Butter Balls
When it comes to making delicious peanut butter balls, there are often a few questions that pop up. Here’s a friendly guide to help you navigate common queries!
Can I make these vegan-friendly?
Absolutely! Transforming your peanut butter balls into a vegan-friendly treat is super easy. Just substitute traditional sweeteners with maple syrup or agave nectar. You can also use vegan chocolate chips if you want to dip or drizzle your balls. It's a simple swap that keeps the flavor intact while catering to your plant-based friends.
If you're looking for suggestions on vegan ingredients, check out resources like PETA. They offer a plethora of options to make your recipes both delicious and cruelty-free.
How long do peanut butter balls last?
When stored properly, peanut butter balls can last about 1-2 weeks in the refrigerator. This makes them a fantastic option for meal prep or snacks during a busy week. If you want to extend their shelf life, consider freezing them. Frozen treats can last up to 3 months—making it easy to enjoy a sweet bite whenever the craving hits!
What’s the best way to store these treats?
For optimal freshness, store your peanut butter balls in an airtight container. If you're stacking them, it’s a good idea to place wax paper between layers to prevent sticking. Keep them in the refrigerator for a chilled treat or the freezer for a quick energy boost that’s ready to eat right away.
Also, consider checking out The Spruce Eats for additional tips on food storage to help maximize your treats’ freshness!
By tackling these FAQs, you can create peanut butter balls that not only taste fantastic but also cater to your lifestyle and preferences. Happy snacking!
Conclusion on Peanut Butter Balls
Final Thoughts on Making Peanut Butter Balls at Home
Making your own peanut butter balls is a rewarding experience that cheers you up, not just because they’re delicious, but also because they’re so easy to whip up. With a few ingredients typically found in your pantry, these treats come together quickly. Plus, you can customize them to suit your taste, whether you prefer dark chocolate or a sprinkle of coconut. Did you know that homemade snacks can not only be more nutritious but also save you money in the long run? You’re embracing healthier choices with every bite.
Encouragement to Try It Yourself!
So why not give it a shot? Whether you're looking for a quick treat, a pre-gym snack, or just something to enjoy with your favorite movie, peanut butter balls fit the bill perfectly. Grab your ingredients, gather your friends or family, and make a fun evening out of it. Who knows? You might just create the next big hit in your household. Don’t forget to share your creations online—your friends will surely be inspired to join in on the fun!
For tips on storage and more snacking ideas, check out The Guardian’s guide to healthy snacking. Happy munching!
Print
Peanut Butter Balls: Easy No-Bake Treats for Everyone
Delicious and easy to make, these peanut butter balls are the perfect no-bake treats for anyone looking for a sweet snack.
- Total Time: 45 minutes
- Yield: 24 balls
Ingredients
- 1 cup peanut butter
- ½ cup honey
- 2 cups rolled oats
- ½ cup chocolate chips
- ¼ cup powdered sugar
Instructions
- In a mixing bowl, combine peanut butter and honey.
- Add rolled oats and mix until evenly combined.
- Stir in chocolate chips and powdered sugar.
- Form the mixture into small balls.
- Chill in the refrigerator for 30 minutes before serving.
Notes
- Make sure to use natural peanut butter for best results.
- You can substitute honey with maple syrup for a vegan option.
- Prep Time: 15 minutes
- Cook Time: 0 minutes
- Category: Dessert
- Method: No-Bake
- Cuisine: American
- Diet: Vegetarian
Nutrition
- Serving Size: 2 balls
- Calories: 150
- Sugar: 10g
- Sodium: 20mg
- Fat: 7g
- Saturated Fat: 1.5g
- Unsaturated Fat: 5g
- Trans Fat: 0g
- Carbohydrates: 18g
- Fiber: 2g
- Protein: 4g
- Cholesterol: 0mg