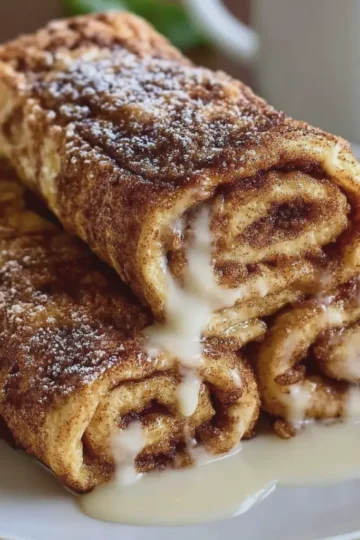
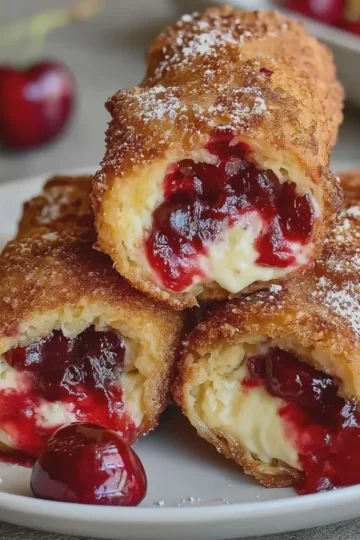
Introduction to Cherry Cheese Danish Recipe
When it comes to indulgent breakfast treats or delightful desserts, nothing compares to the warmth and comfort of a freshly baked cherry cheese danish. There's something incredibly satisfying about biting into a flaky pastry filled with sweet cream cheese and tangy cherries. In today’s busy world, you might wonder why you should even bother making these at home. Let me tell you, a homemade cherry cheese danish recipe is a game changer for several reasons!
Why Homemade Cherry Cheese Danishes are a Game Changer?
-
Freshness Matters: When you whip up your own danishes, you have complete control over the ingredients. You can choose organic cherries, high-quality cream cheese, and other fresh components. This not only enhances the flavor but also allows you to avoid preservatives often found in store-bought pastries. According to a study by the Food Quality and Preference Journal, fresh ingredients can dramatically impact the eating experience.
-
Customization is Key: Think about it: Do you love a bit more sweetness? Or maybe you prefer a little drizzle of icing on top? With your own cherry cheese danish recipe, you can tweak flavors and toppings to your heart's desire. Want to swap cherries for another fruit, like blueberries or raspberries? Go for it!
-
Perfect for Any Occasion: Whether you're hosting a brunch or enjoying a quiet afternoon snack, these danishes fit right in. They’re not just for breakfast – pair them with a cup of coffee for an afternoon pick-me-up or serve them at gatherings to impress guests.
-
Bringing Back Memories: If you've ever made these pastries with a family member or friend, you might have special memories tied to the process. Baking together is a wonderful way to connect, share stories, and create new memories in the kitchen.
By the end of this guide, you'll feel empowered to create your very own cherry cheese danish, right in your kitchen. So, let’s not wait any longer! Ready to roll up your sleeves and get started? Don’t forget to explore some helpful resources, like this baking essentials guide and dive into the world of delicious pastries.

Ingredients for Cherry Cheese Danish
Essential ingredients you'll need
Creating a delicious cherry cheese danish recipe starts with gathering a few key ingredients. Here’s what you’ll need for that delightful pastry:
- Puff pastry: Look for pre-made sheets to simplify your baking process.
- Cream cheese: This is essential for that creamy, dreamy filling.
- Granulated sugar: Sweetens the cream cheese and enhances the overall flavor.
- Sour cream: Adds tanginess and depth to the filling.
- Vanilla extract: Just a splash for a hint of warmth.
- Cherry pie filling: For that signature cherry topping—homemade or store-bought works!
Optional ingredients for a flavor boost
Want to elevate your cherry cheese danish? Consider these optional ingredients to take it up a notch:
- Almond extract: A few drops add a lovely nutty aroma.
- Lemon zest: Brightens the flavors and adds freshness.
- Powdered sugar: For dusting right before serving, creating a beautiful presentation.
By combining these essential and optional ingredients, you’ll craft a cherry cheese danish that’s sure to impress! Want to learn more about the benefits of using fresh ingredients? Check out this article on the advantages of fresh produce. Happy baking!
Preparing Cherry Cheese Danish
Nothing says "weekend brunch" quite like the delightful aroma of freshly baked cherry cheese danishes. If you’ve never attempted to make these delicious pastries from scratch, fear not! This guide will walk you through each step, ensuring you whip up something truly special for yourself or your loved ones.
Gather and prep your ingredients
First things first, let's collect our ingredients. Having everything you need on hand will streamline the entire process:
-
For the dough:
-
1 package of puff pastry (thawed)
-
1 egg (for egg wash)
-
For the cheese filling:
-
8 ounces cream cheese (softened)
-
½ cup granulated sugar
-
1 teaspoon vanilla extract
-
1 large egg yolk
-
For the cherry topping:
-
1 cup fresh or canned cherries (pitted)
-
2 tablespoons sugar (for sweetness)
-
1 tablespoon cornstarch (to thicken)
-
1 tablespoon lemon juice
Gathering your ingredients and prepping them ahead of time will save you from fumbling around while you're deep into the process. It makes cooking a lot more enjoyable—don’t you think?
Prepare the dough
Now that you're ready, let's move on to preparing the dough. Puff pastry is your best friend here. It creates those beautiful flaky layers that are perfect for a cherry cheese danish recipe. Follow these steps:
-
Roll out the puff pastry: Lightly flour your work surface and roll out the pastry into a large rectangle, about ⅛ inch thick. This helps it cook evenly.
-
Cut into squares: Carefully cut the dough into 4- or 5-inch squares. You can make them uniform for a clean presentation—perfect for impressing guests or enjoying a delightful solo treat.
Remember, you don’t have to be a pastry chef to succeed here; just enjoy the process!
Make the cheese filling
While your dough is set and ready, it’s time to whip up that luscious cheese filling. Here's how:
-
Combine the ingredients: In a mixing bowl, blend the softened cream cheese, sugar, vanilla extract, and egg yolk until you achieve a smooth and creamy texture. If you’d like, you can add a pinch of salt or a sprinkle of cinnamon for an extra flavor kick.
-
Taste test: You can’t resist a little taste to check for sweetness and flavor, right? Just keep in mind that the final taste will be balanced with the tartness of the cherries.
This creamy mixture is what makes your cherry cheese danish so irresistible!
Assemble your danishes
Now comes the fun part—putting it all together! Here’s how you can assemble your danishes:
-
Shape the pastry: Take each square of puff pastry and use a sharp knife to cut a border about ½ inch from the edges (don’t cut all the way through). This will create a lovely raised frame that holds in your cheese filling.
-
Add the filling: Spoon a generous tablespoon of the cheese filling into the center of each square, spreading it out slightly.
-
Top it off: Add a few cherries on top of the cream cheese filling. If using canned cherries, drain them well to avoid excess moisture.
Bake until golden and delicious
Finally, it’s time to bring your cherry cheese danishes to life with baking. Preheat your oven to 375°F (190°C):
-
Egg wash: Brush the edges of your puff pastry squares with the beaten egg for that lovely golden finish.
-
Bake: Place your assembled danishes on a parchment-lined baking sheet and pop them into the oven for 20-25 minutes or until they turn a beautiful golden brown.
-
Cooling: Once out of the oven, let them cool slightly before indulging.
Delicious pastries like these have a way of bringing comfort and joy, don’t they? This homemade cherry cheese danish recipe is sure to become a favorite!
Now that you're equipped with knowledge and skills, why not dive into the kitchen and start baking? If you want to explore more about baking techniques or pastry tips, you might find useful insights at King Arthur Baking. Happy baking!

Variations on Cherry Cheese Danish
Almond-flavored Cherry Cheese Danish
If you're looking to elevate your cherry cheese danish recipe, consider adding a hint of almond flavor. By incorporating almond extract into the cream cheese mixture, you can transform the classic version into something truly special. Here's how:
- Ingredients: Use your usual cream cheese filling but add a teaspoon of almond extract to it.
- Topping: Sprinkle sliced almonds on top before baking for that extra crunch and nutty flavor.
This variation pairs beautifully with fresh cherries, and the nutty aroma wafting from your oven will have everyone eagerly anticipating a taste. Trust me, once you try this, you might just want to keep almond extract on hand for all your pastry needs.
Nutty Cherry Cheese Danish
Another fantastic twist on the traditional cherry cheese danish recipe involves mixing in some nuts—be it pecans, walnuts, or even pistachios. Nuts add a delightful texture and depth of flavor that complements the sweetness of the cherries. To create your Nutty Cherry Cheese Danish:
- Blend with cream cheese: Finely chop your choice of nuts and mix them into the cream cheese filling.
- Top it off: After glazing your pastries with a simple syrup, sprinkle some more chopped nuts on top for a delightful crunch.
The result? A cherry cheese danish that’s not just sweet but also packed with satisfying nutty goodness. You might even find yourself daydreaming about this treat while at work, making it an ideal snack for busy professionals.
For more inspiration, check out our top nut recipes that can enhance your baking! Each variation provides a unique take that can keep your dessert game fresh and exciting—perfect for brunches or cozy evenings at home.
Cooking Tips and Notes for Cherry Cheese Danish
How to Achieve the Perfect Flaky Texture
The key to a flaky crust in your cherry cheese danish recipe lies in the cold ingredients. Always use cold butter, and be sure to work the dough quickly to keep it from warming up. When you roll out the dough, fold it multiple times to create layers. The more, the better! A quick chill in the fridge before baking can also help maintain that desired flakiness.
- Use a pastry cutter or your fingers to incorporate the butter into the flour—avoid overworking it.
- Don’t skip the resting time; give your dough at least 30 minutes in the fridge.
Tips for Ensuring Your Filling is Creamy
For a smooth and creamy filling, room temperature ingredients are essential. Make sure your cream cheese is softened before mixing. This prevents clumps and creates a luscious texture that pairs perfectly with the tartness of cherries.
- Consider adding a splash of vanilla extract or a hint of lemon zest for extra flavor depth.
- Mix carefully to avoid incorporating too much air, which can create a dry filling.
As you follow this cherry cheese danish recipe, remember, baking is as much about experience as it is about ingredients. Be patient and enjoy the process! If you want more tips, check out this guide on pastry dough. It's a game-changer!

Serving Suggestions for Cherry Cheese Danish
Pairing with Coffee or Tea
Elevate your cherry cheese danish recipe experience by pairing it with the perfect beverage. A warm cup of coffee—or perhaps a soothing herbal tea—can enhance the flavors of your danish, making each bite even more delightful. Consider a medium roast coffee if you enjoy a rich flavor profile, as its creamy undertones will complement the sweet and tangy cherry filling beautifully. Green or chamomile tea can provide a refreshing counterpoint to the richness of the danish, perfect for a cozy afternoon break.
Creative Plating Ideas
Presentation matters! Serve your cherry cheese danish on a stylish, vibrant plate that contrasts with the golden-brown pastry. Dust with powdered sugar for an elegant touch, or place a sprig of fresh mint on the side for color and freshness. For an impressive brunch display, you might create a tiered dessert stand, showcasing these beauties alongside other treats like fresh fruit or Greek yogurt. This not only elevates the look but also invites guests to mix and match flavors—what a fun way to share your cherry cheese danish recipe!
For more creative serving ideas, visit The Spruce Eats and explore their culinary inspiration. Why not also consider a delightful fruit compote on the side? Your friends and family will love it!
Time Breakdown for Cherry Cheese Danish
When you're in the mood for a delightful cherry cheese danish, understanding the time you'll need can make the process smooth and enjoyable. Here’s how it breaks down:
Preparation Time
Getting all your ingredients ready takes about 15 minutes. This includes making the cream cheese mixture and handling the Danish pastry dough. You’ll want to gather everything beforehand to streamline your baking.
Baking Time
Your cherry cheese danish will need roughly 20-25 minutes in the oven. The goal is a golden-brown crust, which perfectly complements the sweet cherry filling.
Total Time
So, combining prep and baking, you're looking at around 35-40 minutes from start to finish. Not too shabby, right? You can serve these delectable treats fresh from the oven before your weekend brunch.
If you're curious about other variations, check out this page on cherry recipes for inspiration!
Nutritional Facts for Cherry Cheese Danish
If you're indulging in a slice of this delightful Cherry Cheese Danish, you might be curious about its nutritional profile. Here are some essential facts to consider:
Calories per serving
A typical serving of a Cherry Cheese Danish contains around 300-350 calories. While it's a tasty treat, it’s important to keep portion sizes in mind, especially if you’re balancing a daily caloric intake.
Protein content
When it comes to protein, each danish offers about 6-8 grams. This isn’t a significant source of protein, but it can contribute to your overall daily intake, especially when paired with a source of lean protein like Turkey Bacon for breakfast.
Sodium levels
Be aware of sodium content! A serving generally contains 300-400 milligrams of sodium. This isn’t too excessive, but if you’re watching your sodium intake for health reasons, it’s wise to enjoy your Cherry Cheese Danish in moderation.
For more health insights, check out resources like the USDA Nutrition Database for a comprehensive look at food nutrients. Or, if you'd like to dive deeper into caloric information, the Calorie Control Council is an excellent resource to guide you in making informed choices. Remember, balance is key when enjoying delightful pastries!
FAQs about Cherry Cheese Danish
Can I use frozen cherries for the filling?
Absolutely! Using frozen cherries can be a fantastic alternative if you don’t have fresh ones on hand. Just make sure to thaw and drain them well to avoid excess moisture. This way, your filling remains deliciously thick and won’t make your Cherry Cheese Danish soggy. It’s a simple swap that saves time and still delivers great flavor!
How do I store leftover cherry danishes?
Leftover cherry danishes can be stored for later enjoyment! Place them in an airtight container and keep them at room temperature for up to two days. If you want to store them longer, wrapping them tightly in plastic wrap or aluminum foil and placing them in the fridge is a good option. They’ll stay fresh for about a week this way.
What is the best way to reheat them?
To reheat your danish while preserving their delightful texture, preheat your oven to 350°F (175°C). Place the danish on a baking sheet and warm them for about 5-10 minutes. This method brings back that crispy crust we all love, rather than risking a soggy mess in the microwave. If you’re in a hurry, you can pop them in the microwave for about 15-20 seconds, but just be careful not to overdo it!
For tips on perfecting your Cherry Cheese Danish recipe, consider checking out Serious Eats for detailed insights on baking techniques. Whether you’re making them for brunch or a tasty treat later in the week, these tips will help ensure it’s a delightful experience every time!
Conclusion on Cherry Cheese Danish Recipe
Why You Should Try Making This Delightful Treat at Home
There’s something truly special about baking your own cherry cheese danish. Not only does it fill your kitchen with a mouthwatering aroma, but it also gives you the chance to impress friends and family with your culinary skills. Plus, when you make it at home, you have the freedom to tailor the ingredients to your taste. Want a creamier filling? Go for it! Prefer a sweeter cherry topping? Why not!
Making this treat can also be a great way to unwind after a busy day. So why not give this cherry cheese danish recipe a try? It’s a fun project that brings a touch of pastry shop elegance right to your breakfast table. You’ll be rewarded not just with deliciousness, but with the satisfaction of having made something wonderful from scratch!
For more tips on gourmet pastries, check out The Perfect Pastry, where you'll find a wealth of baking inspiration.
Print
Cherry Cheese Danish Recipe: The Easy Indulgence You’ll Love
Indulge in the irresistibly creamy and fruity delight of Cherry Cheese Danish. Perfect for breakfast or dessert, this simple recipe will please everyone!
- Total Time: 35 minutes
- Yield: 8 servings
Ingredients
- 1 package crescent roll dough
- 8 ounces cream cheese
- ½ cup sugar
- 1 teaspoon vanilla extract
- 1 cup cherry pie filling
- 1 egg (beaten)
- 1 tablespoon powdered sugar (for dusting)
Instructions
- Preheat the oven to 375°F (190°C).
- In a bowl, mix cream cheese, sugar, and vanilla until smooth.
- Unroll the crescent dough and separate it into triangles.
- Place a tablespoon of the cream cheese mixture on each triangle and top with cherry filling.
- Fold the dough over to form a triangle and pinch the edges to seal.
- Brush the tops with beaten egg.
- Bake for 15-20 minutes until golden brown.
- Dust with powdered sugar before serving.
Notes
- For a different flavor, try using blueberry or raspberry filling.
- This recipe can be made ahead of time and baked when ready to serve.
- Prep Time: 15 minutes
- Cook Time: 20 minutes
Nutrition
- Serving Size: 1 Danish
- Calories: 230
- Sugar: 12g
- Sodium: 300mg
- Fat: 12g
- Saturated Fat: 6g
- Unsaturated Fat: 4g
- Trans Fat: 0g
- Carbohydrates: 30g
- Fiber: 1g
- Protein: 4g
- Cholesterol: 30mg