Introduction to Easter Bunny Pastel Layer Cake
The nostalgia of Easter baking
There's something truly special about baking for Easter that evokes a sense of nostalgia. Many of us remember gathering in a loved one’s kitchen, the warm scents of baking filling every corner, and the laughter shared over frosting mishaps and playful debates over the best pastel colors. The Easter Bunny Pastel Layer Cake exemplifies this delightful tradition—a dessert that not only represents the holiday spirit but also invites creativity and joy into your baking routine. It’s a wonderful way to celebrate new beginnings, much like the season itself. For a lovely read on the history of Easter traditions, check out this article from History.com.
Why layer cakes make occasions special
Layer cakes hold a unique charm that elevates any event. Their towering presence on a dessert table draws everyone’s eye, creating an atmosphere of excitement that simpler desserts often lack. Each slice reveals a colorful cross-section, bursting with flavor and texture, making it the talk of the party.
What is it about a layered cake that makes it so special?
-
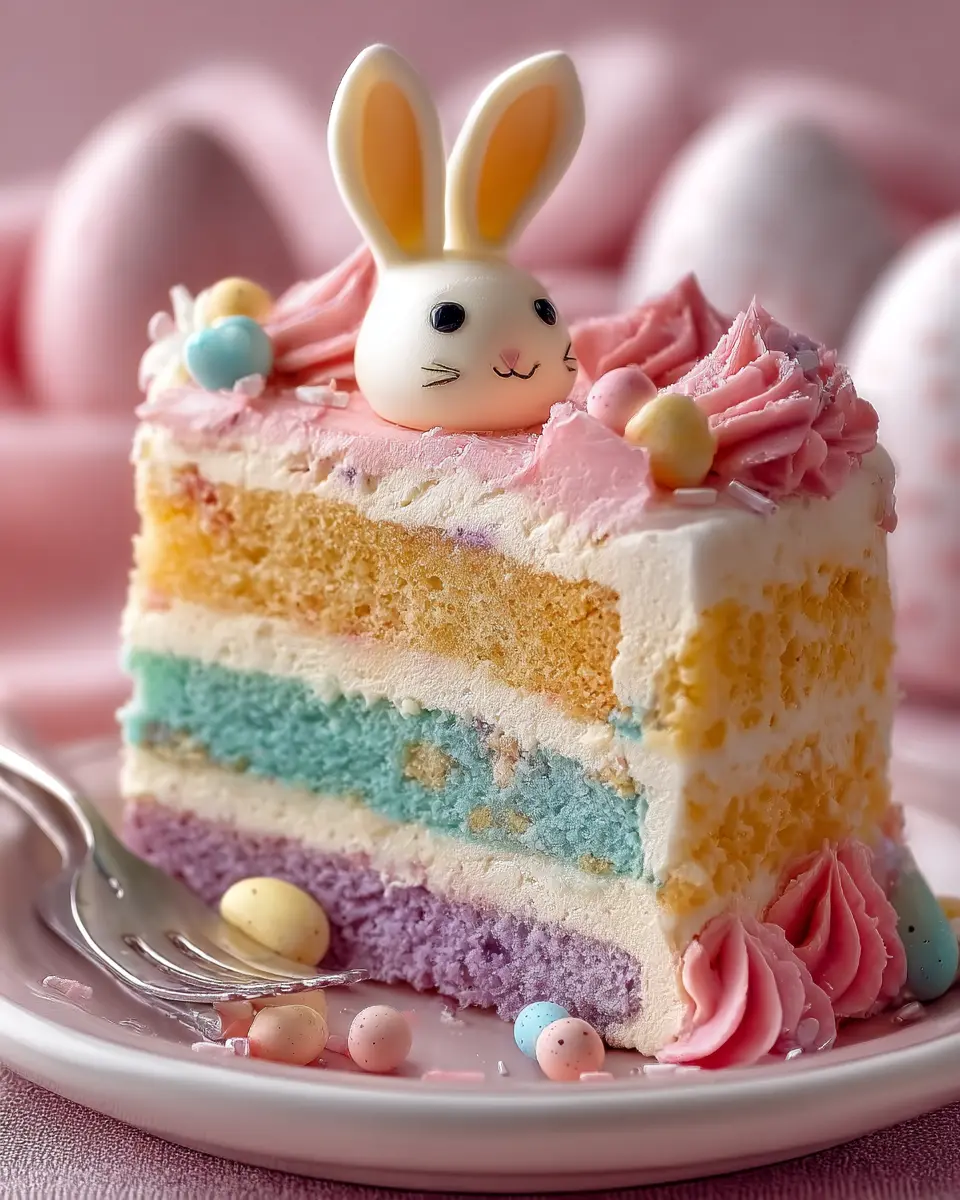
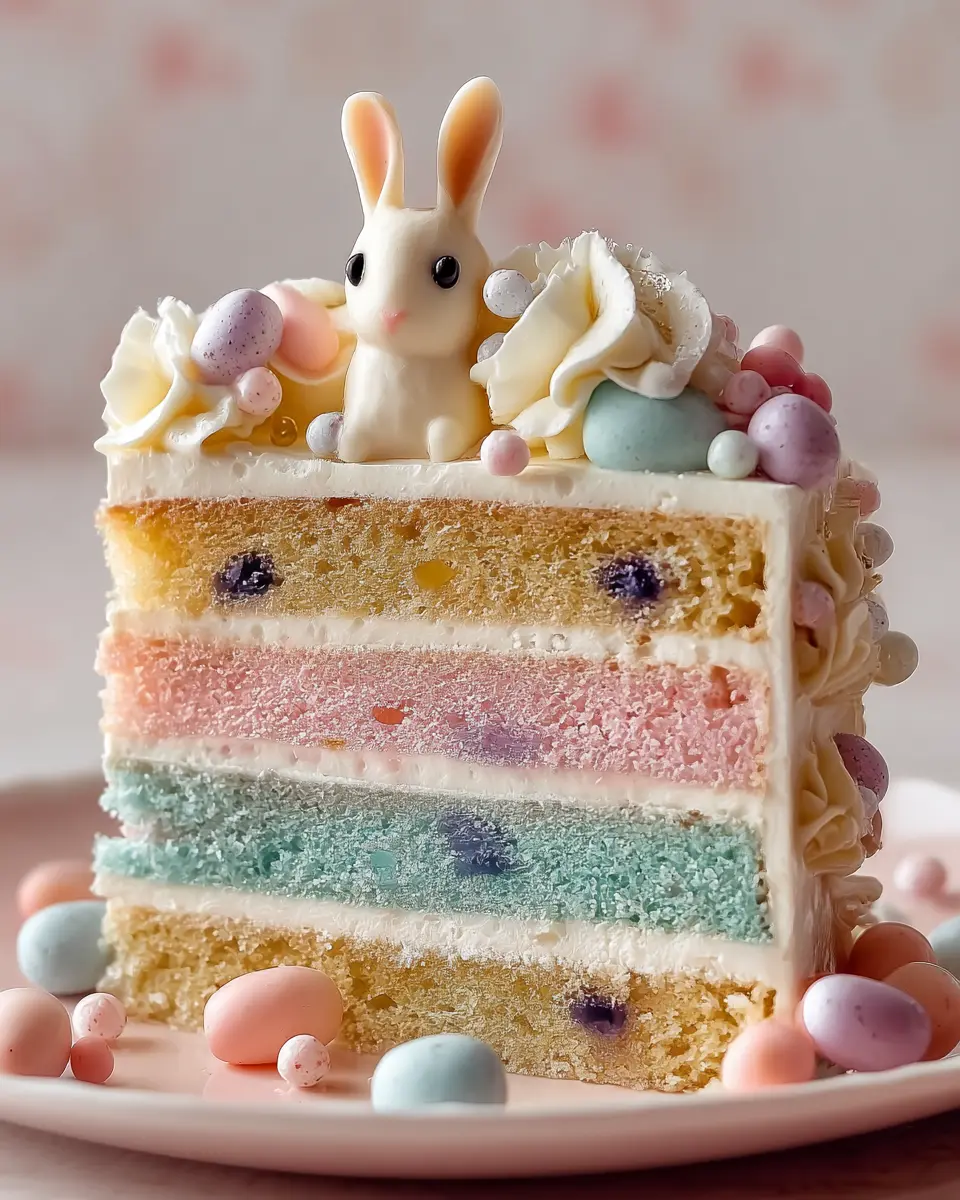
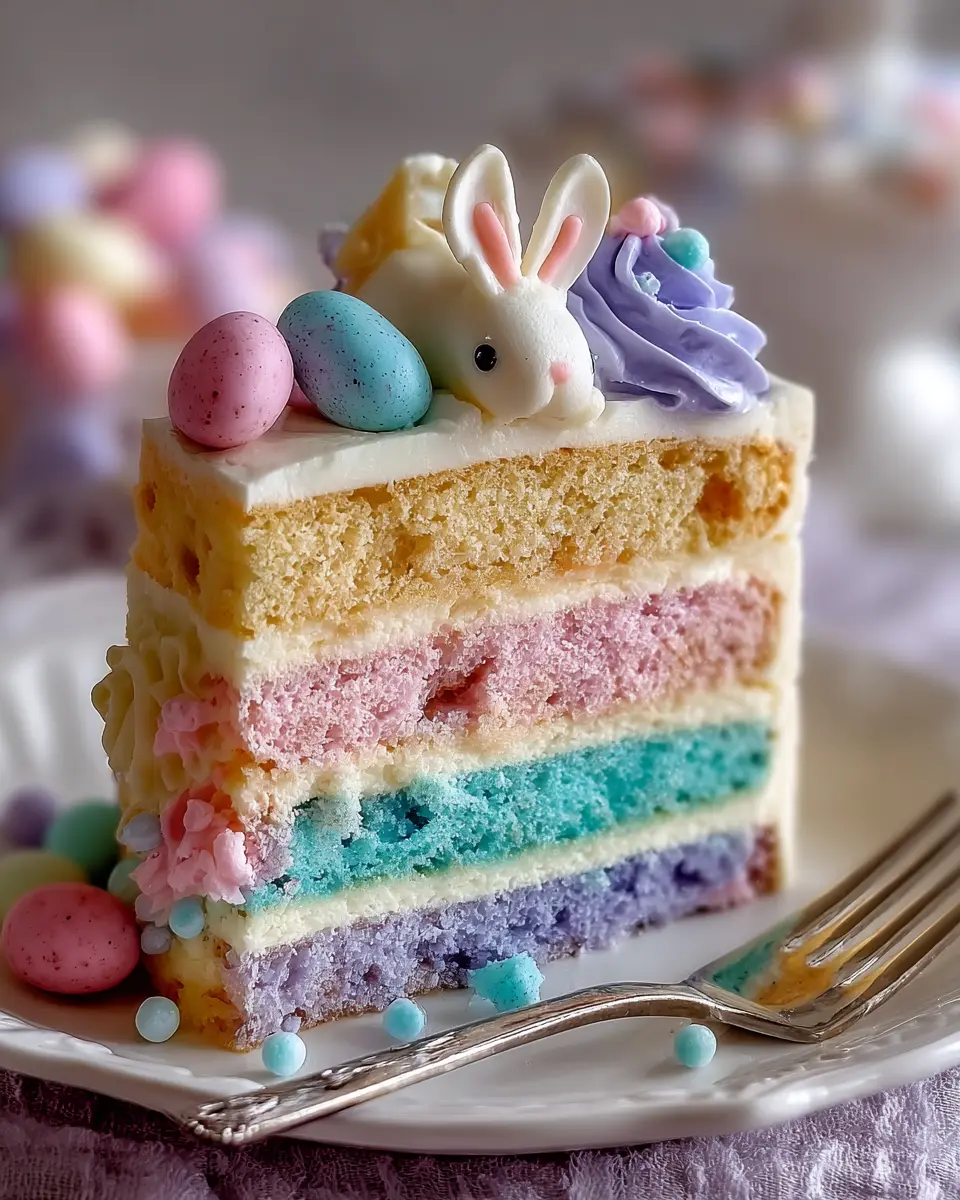
Visual Appeal: The vibrant colors and decorative elements of an Easter Bunny Pastel Layer Cake can transform a simple gathering into a festive celebration. Picture this: a cake dressed in soft pinks, blues, and yellows, topped with a playful bunny figure.
-
Taste Variety: Each layer can feature different flavors, offering a variety that satisfies different taste buds. Imagine traditional vanilla, rich chocolate, or even lemon zest—each bite can be a delightful surprise.
-
Memorable Moments: Have you ever been part of a cake-cutting ceremony, where everyone eagerly anticipates the first slice? That moment becomes a treasured memory. Celebrating with family and friends around a stunning cake creates connections that last a lifetime.
Baking an Easter Bunny Pastel Layer Cake brings not just flavor but love into the kitchen. So, gather your loved ones, don your aprons, and let’s create something wonderful together! Whether this is your first Easter baking experience or a well-loved tradition, this cake is sure to be a hit, making memories that you'll carry well beyond the holiday.
Ingredients for Easter Bunny Pastel Layer Cake
Creating the ultimate Easter Bunny Pastel Layer Cake is not just about baking; it’s about combining flavors and textures. Let's gather our ingredients to bring this delightful vision to life!
Essential Cake Ingredients
To start, you’ll need:
- Cake Flour: For a light, fluffy texture.
- Granulated Sugar: To add sweetness, balancing the flavors beautifully.
- Unsalted Butter: The foundation of richness; bring it to room temperature for easy mixing.
- Eggs: Three large eggs are essential for binding.
- Milk: Whole milk provides moistness to the cake.
- Baking Powder and Baking Soda: These will make your layers rise!
Whipped Frosting Ingredients
Now for the frosting that will hold it all together:
- Heavy Cream: The star ingredient for achieving stability and fluffiness.
- Powdered Sugar: Added for sweetness and smoothness.
- Vanilla Extract: A splash adds warmth and flavor.
Decorative Toppings
Here’s where your creative side can shine through:
- Colorful Sprinkles: Perfect for that festive touch.
- Edible Flowers: An elegant addition for presentation.
- Chocolate Bunny or Peeps: A simple way to embody the Easter spirit.
Gather these ingredients, and you’ll be on your way to crafting a beautiful and tasty Easter Bunny Pastel Layer Cake that everyone will love! For more ideas on decorating, check out this incredible guide from Food Network.
Step-by-step Preparation of Easter Bunny Pastel Layer Cake
Baking brings people together, especially during festive occasions like Easter! Create a delightful Easter Bunny Pastel Layer Cake that’s sure to impress family and friends. With its vibrant colors and soft layers, this cake isn’t just a treat for the taste buds but also a feast for the eyes. Let's break down the preparation into manageable steps.
Preheat the oven and prepare the pan
First, preheat your oven to 350°F (175°C). This is crucial because you want your cake to rise beautifully. While it's heating up, prepare your cake pans. Grease two or three 9-inch round cake pans with butter or non-stick spray. For easier removal later, consider lining the bottom with parchment paper. If you want more information on the best cake pans to use, check out this article on [baking basics](https://www.baking basics.com/baking-tools).
Mix the cake batter
In a large mixing bowl, it’s time to whip up your vanilla cake batter — super easy and oh-so-delicious! Start by creaming together 1 cup of unsalted butter and 2 cups of sugar until light and fluffy. Typically, this should take about 5 minutes. Next, add 4 large eggs one at a time, followed by 2 teaspoons of vanilla extract. In a separate bowl, combine 3 cups of all-purpose flour, 1 tablespoon of baking powder, and a pinch of salt. Gradually add the dry mixture to the wet, alternating with 1 cup of milk, ensuring everything is blended thoroughly.
Divide and color the batter
Here comes the fun part! Divide your batter evenly into three bowls. Each bowl will be colored for your layers. Use food coloring to create pastel shades – think soft pinks, blues, and yellows. Start with a few drops, mix well, and add more until you're satisfied with the color. The key is to make them soft and vibrant — but not too dark!
Layer the cake batter in the pan
Now, here's where the magic happens. Carefully pour each color into the prepared cake pans. Start with one color and gently tap it on the counter to eliminate air bubbles, then move on to the next color. Don’t worry about making them perfect; the layers will create a beautiful mottled effect as they bake.
Bake the cake to perfection
Place the pans in your preheated oven and bake for 25–30 minutes, or until a toothpick inserted in the center comes out clean. Every oven is different, so keep an eye on your cake after the 25-minute mark. Once done, allow them to cool in the pan for about 10 minutes before transferring them to a wire rack to cool completely.
Whip up the frosting
While the cake layers cool, let’s prepare a fluffy vanilla frosting. In a mixing bowl, beat 1 cup of unsalted butter until creamy. Slowly add 4 cups of powdered sugar and gradually mix in ¼ cup of milk and 2 teaspoons of vanilla extract until you achieve your desired consistency. Want a fun twist? Consider adding some lemon zest for a refreshing burst of flavor.
Frosting the cooled cake
Once your cake layers are cool, it’s time to frost! Start with the first layer on your serving platter. Spread a generous amount of frosting on top, then place the second layer on top of it. Repeat this for each layer. Be sure to apply a crumb coat — a thin layer of frosting across the surface to trap any loose crumbs. Chill the cake for about 30 minutes.
Decorate the cake creatively
Finally, unleash your inner artist! Once the crumb coat is set, cover the entire cake with the remaining frosting. Use a spatula to create swirls or smooth finishes. For a festive touch, decorate with chocolate eggs, edible flowers, or even cute edible bunnies.
Creating an Easter Bunny Pastel Layer Cake not only adds sweetness to your holiday table but also becomes a cherished tradition for years to come. Happy baking!
Variations on Easter Bunny Pastel Layer Cake
Chocolate Pastel Layer Cake
For chocolate lovers, why not twist the traditional Easter Bunny Pastel Layer Cake into a heavenly chocolate delight? Simply substitute the vanilla cake layers with rich chocolate cake layers. Use a high-quality cocoa powder like Valrhona for that deep, indulgent flavor. Layer the cake with a light chocolate ganache instead of the typical buttercream, allowing for a smoother texture that pairs wonderfully with pastel colors. You can incorporate chocolate shavings or sprinkles to add extra flair and fun!
If you're feeling adventurous, try filling the layers with flavored chocolate mousse or fresh berries for added moisture and taste. The contrast between the chocolate and pastel colors makes for a stunning visual appeal, perfect for your Easter table.
Gluten-Free Pastel Layer Cake
For those needing a gluten-free option, fear not! You can easily transform the Easter Bunny Pastel Layer Cake by choosing the right ingredients. Opt for a gluten-free flour blend that includes xanthan gum—this will help mimic the texture of traditional flour. Brands like Bob’s Red Mill offer amazing options.
Pair this cake with a gluten-free buttercream or a cream cheese frosting flavored with your favorite extracts. You might even consider replacing some of the sugar with honey or maple syrup for a natural sweetness!
When decorating, consider adding edible flowers, fruits, or even gluten-free sprinkles for that special touch. This version will be perfect for anyone looking for a delicious dessert without the gluten but with all the charm of a festive Easter celebration.
For more gluten-free baking tips and recipes, check out Gluten-Free Baking, a great resource for all things gluten-free in your kitchen!
Cooking Tips and Notes for Easter Bunny Pastel Layer Cake
Achieving Perfect Pastel Layers
Creating the Easter Bunny Pastel Layer Cake starts with the right technique. For those vibrant, eye-catching layers, use gel food coloring instead of liquid. Gel colors produce richer shades and require less of it, giving you that perfect pastel hue. When mixing in the colors, start with just a drop, and build from there until you achieve your desired look. Always taste as you go; nobody wants a beautifully colored but flavorless cake!
Importance of a Cooling Rack
Once your cake layers are baked to perfection, it's crucial to let them cool properly. A cooling rack allows air to circulate around the cake, preventing sogginess. It’s tempting to rush assembly, but patience pays off: a completely cooled cake will slice easier and hold its shape better. Plus, you’ll avoid that dreaded “slipping” layer syndrome!
For more baking tips and techniques, consider consulting expert sources like King Arthur Baking or Bake From Scratch for additional inspiration. Happy baking!
Serving Suggestions for Easter Bunny Pastel Layer Cake
Best accompaniments for the cake
When you whip up an Easter Bunny Pastel Layer Cake, serving it with thoughtful accompaniments can elevate the experience. Consider pairing the cake with:
- Fresh Berries: Strawberries, blueberries, and raspberries add a burst of freshness that contrasts beautifully with the rich cake layers.
- Whipped Cream: A dollop of lightly sweetened whipped cream can bring a delightful lightness to each slice.
- Tea or Coffee: A fragrant herbal tea or a robust coffee can offer a perfect balance to the cake’s sweetness, making for a cozy pairing.
Creative serving ideas
Want to wow your guests? Try these creative serving ideas:
- Decorative Plating: Arrange slices on colorful plates and sprinkle edible flowers around for a delightful springtime presentation.
- Layered Parfaits: Crumble leftover cake and layer it with yogurt, whipped cream, and fruit in mason jars for a fun twist.
- Easter-Themed Serving Trays: Use bunny-shaped platters or pastel-colored serving trays to enhance the festive vibe—perfect for a cheerful Easter brunch.
By using these suggestions, you’ll create a memorable moment around your Easter Bunny Pastel Layer Cake that everyone will cherish!
Time Breakdown for Easter Bunny Pastel Layer Cake
When it comes to creating a delightful Easter Bunny Pastel Layer Cake, timing is everything. Here’s a quick guide to help you navigate the process seamlessly.
Preparation Time
Gather your ingredients, which include flour, sugar, eggs, and plenty of pastel food coloring. This step should take about 30 minutes. Don't forget to preheat your oven while you mix!
Baking Time
Pour your batter into the cake pans and let them bake for 25 to 30 minutes. The tantalizing aroma of your cake will fill the kitchen, making waiting a little easier!
Cooling and Decorating Time
After baking, allow your layers to cool completely, which typically takes about 1 hour. Decorating can take an additional 30 minutes, especially if you're adding intricate designs or those adorable bunny decorations. For tips on decoration, consider checking out Baker’s Royale for inspiration.
With this time breakdown, you’ll be well on your way to impressing your guests with a stunning and delicious cake!
Nutritional Facts for Easter Bunny Pastel Layer Cake
Calories
The Easter Bunny Pastel Layer Cake is indulgent and delightful, making it a perfect centerpiece for your spring celebrations. Each slice contains approximately 350 calories, which makes it a treat best enjoyed in moderation—especially if you’re planning to indulge in other Easter goodies.
Sugar Content
With about 30 grams of sugar per slice, this cake certainly satisfies your sweet tooth. While it’s perfect for celebrations, you may want to balance it out with some healthier options during your meal.
Servings
This scrumptious cake serves about 12 people, making it ideal for family gatherings and festive brunches. You can easily adjust the recipe if you’re expecting a smaller crowd or want to save some slices for later.
For more insights on managing sugar intake, feel free to check articles on the American Heart Association's website or Mayo Clinic’s nutrition page. Treat yourself, but do so wisely!
FAQs about Easter Bunny Pastel Layer Cake
Can I use different colors for the cake layers?
Absolutely! The beauty of the Easter Bunny Pastel Layer Cake lies in its versatility. Feel free to mix and match colors to create layers that reflect your style or Easter theme. Pastel shades like lavender, mint green, and buttery yellow are traditional, but vibrant colors can also add a playful touch. Just remember to use gel food coloring for the most vivid results without altering the batter’s consistency.
How can I make the frosting even thicker?
If you’re looking for that perfect, luscious frosting, there are a few tricks you can employ. First, consider adding more powdered sugar to your buttercream. This simple ingredient will create a thicker consistency. Additionally, chilling your frosting for about 30 minutes before using it can help it firm up. If you're going for extra stability, try incorporating a bit of cream cheese into your buttercream, which also adds a rich flavor profile!
What’s the best way to store leftover cake?
Leftover cake is a delightful treat, and knowing how to store it properly will keep it fresh longer. Wrap slices of your Easter Bunny Pastel Layer Cake tightly in plastic wrap or place them in an airtight container at room temperature for up to two days. If you want to keep it longer, store the cake in the refrigerator for up to one week. For longer storage, you can freeze it! Just ensure you wrap it well in plastic and foil to prevent freezer burn. When you're ready to enjoy it again, simply thaw it in the fridge overnight and let it come to room temperature before serving.
Discover more baking tips and tricks at The Kitchn or American Test Kitchen to elevate your cake baking game!
Conclusion on Easter Bunny Pastel Layer Cake
Celebrating with homemade goodness
Bringing the Easter Bunny Pastel Layer Cake to your table is more than just a treat; it’s a celebration of creativity, family, and the joy of homemade goodness. The vibrant layers and delightful flavors will surely impress your guests and create cherished memories. Did you know that baking at home can strengthen family bonds? A 2018 study by Just a Pinch found that sharing recipes boosts connection among loved ones.
Inviting friends to join the fun
Don’t keep all the fun to yourself! Invite friends over for a festive cake-decorating party. It’s a wonderful way to celebrate Easter traditions together while enjoying some sweet treats and great company. Whether you're serving this colorful cake with fresh fruit or a refreshing herbal iced tea, your gathering will be a hit. After all, sharing delicious food enhances any celebration and creates lasting friendships. For inspiration on hosting your own Easter party, check out this helpful guide from The Spruce Eats on making gatherings memorable. Happy baking!
Print
Easter Bunny Pastel Layer Cake: The Best Easter Dessert Ever
This delightful Easter Bunny Pastel Layer Cake is the perfect centerpiece for your Easter celebration. With its vibrant pastel layers and charming bunny decoration, it's sure to impress your guests.
- Total Time: 1 hour
- Yield: 12 servings
Ingredients
- 2 cups all-purpose flour
- 1 ½ cups granulated sugar
- 1 cup unsalted butter, softened
- 4 large eggs
- 1 cup milk
- 2 teaspoons baking powder
- ½ teaspoon salt
- 1 teaspoon vanilla extract
- 3 food coloring gels (pink, blue, yellow)
- 2 cups buttercream frosting
- 1 edible bunny decoration
Instructions
- Preheat the oven to 350°F (175°C) and grease three 9-inch round cake pans.
- In a large bowl, cream together the butter and sugar until light and fluffy.
- Add the eggs one at a time, mixing well after each addition.
- Stir in the milk and vanilla extract.
- In another bowl, combine the flour, baking powder, and salt.
- Gradually add the dry ingredients to the wet mixture until fully combined.
- Divide the batter into three bowls and add a different food coloring gel to each bowl.
- Pour the colored batters into the prepared cake pans and bake for 25-30 minutes.
- Once cooled, layer the cakes with buttercream frosting in between.
- Frost the outside of the cake and decorate with the bunny.
Notes
- Make sure to let the cakes cool completely before frosting.
- This cake can be made a day in advance and stored in the refrigerator.
- Prep Time: 30 minutes
- Cook Time: 30 minutes
- Category: Dessert
- Method: Baking
- Cuisine: American
- Diet: Vegetarian
Nutrition
- Serving Size: 1 slice
- Calories: 350
- Sugar: 25g
- Sodium: 200mg
- Fat: 15g
- Saturated Fat: 8g
- Unsaturated Fat: 5g
- Trans Fat: 0g
- Carbohydrates: 50g
- Fiber: 1g
- Protein: 4g
- Cholesterol: 60mg