Introduction to Mini Pizza Buns
The love for homemade food
There's something incredibly satisfying about creating your own meals at home. Aside from the obvious benefits of avoiding preservatives and excess sodium often found in store-bought snacks, homemade food delivers a certain warmth that only comes from a little extra effort in the kitchen. For young professionals juggling busy lives, finding quick yet fulfilling bites can feel like a daunting task. That's when mini pizza buns step into the spotlight, turning a typical snack into a gourmet experience.
The beauty of making your own mini pizza buns lies in the flexibility of ingredients available at your fingertips. You can experiment with various toppings, from turkey bacon to chicken ham, and even an array of vegetables, ensuring each batch is uniquely yours. It's a delightful culinary adventure that not only satisfies your cravings but also boosts your creativity in the kitchen. Plus, with a few easy steps, you can whip these up in no time!
Why mini pizza buns are a perfect snack
So, why are mini pizza buns ideal as a snack? Let’s break it down:
-
Portability: They are small and easy to carry, making them a perfect on-the-go snack for those busy workdays or weekend adventures.
-
Customizable: You can load them up with your favorite fillings, whether you’re a cheese lover, a veggie enthusiast, or someone who simply adores meats like beef. No matter your preference, there's a combination that will hit the spot.
-
Comfort food: Tearing into a warm, cheesy bun is a nostalgic experience for many. They evoke comfort and coziness, whether you're enjoying them while binge-watching your favorite series or hosting a game day gathering.
-
Quick and easy: In just a few steps, you can create delicious mini pizza buns that are ready in under an hour. With simple ingredients typically found in your pantry, you can have a delightful treat on hand with minimal fuss.
If you want to explore more about the joys of homemade snacking, you might find this article on food and wellbeing quite enlightening. And don't forget, the charm in mini pizza buns is just waiting to be unwrapped!

Ingredients for Mini Pizza Buns
Creating mini pizza buns is a delightful way to satisfy those snack cravings! Let’s break down the essential ingredients you’ll need to make these tasty bites.
Essential Dough Ingredients
To whip up a soft and chewy dough, gather:
- All-purpose flour: This will be your base.
- Active dry yeast: For that perfect rise.
- Warm water: Activate the yeast with a gentle soak.
- Olive oil: Adds richness and moisture.
- Sugar: Just a pinch helps activate the yeast.
- Salt: Essential for flavor.
These ingredients come together to create a dough that’s both fluffy and flavorful. You can check out more about dough-making techniques on King Arthur Baking.
Key Filling Ingredients
For the delectable heart of your mini pizza buns, consider these staples:
- Mozzarella cheese: The classic pizza cheese, gooey and melty.
- Tomato sauce: A simple blend of crushed tomatoes, herbs, and spices.
- Turkey bacon or chicken ham: These lean options offer a savory kick.
- Bell peppers and onions: For an extra crunch and flavor burst.
Topping Ingredients
Top your charming buns with a few finishing touches:
- Grated Parmesan cheese: Adds a salty, nutty flavor.
- Italian herbs: Think oregano and basil for a classic touch.
- Olive oil drizzle: Just a few drops for that golden finish.
With these ingredients in hand, you're all set to create delicious mini pizza buns that are perfect for gatherings or a cozy night in. So, what are you waiting for? Let's get cooking!
Step-by-step Preparation of Mini Pizza Buns
Making mini pizza buns is not just a delightful culinary experience; it's also a fantastic way to impress your friends or family with minimal effort. Let’s dive into the preparation process, breaking it down step-by-step to ensure you create these cheesy, savory bites flawlessly.
Activate the yeast
First things first: activating the yeast. This step is crucial as it sets the foundation for your dough to rise beautifully. Here’s how to do it:
- Warm up about 1 cup (240 ml) of water to around 110°F (43°C). It’s the sweet spot – too hot and you'll kill the yeast; too cool and it won’t activate.
- In a small bowl, combine the warm water with 2 teaspoons of sugar and 1 packet (2 ¼ teaspoons) of active dry yeast.
- Stir gently and let it sit for about 5-10 minutes. You should see bubbles forming and the mixture frothing; that’s the yeast coming to life!
Did you know that yeast has been used in baking for thousands of years? This tiny organism works wonders, creating carbon dioxide and making your dough rise. For more insights about yeast and its history, visit The Science of Yeast.
Make the dough
Once your yeast is activated, it's time to make the dough for your mini pizza buns. Gather the following ingredients:
- 3 cups (360 g) of all-purpose flour
- 1 teaspoon of salt
- 1 tablespoon of olive oil
- Your activated yeast mixture
In a large mixing bowl, combine the flour and salt. Then, make a well in the center and add the yeast mixture along with the olive oil.
- Stir until a shaggy dough forms.
- Transfer it to a lightly floured surface and knead for about 5-7 minutes, or until the dough is smooth and elastic.
Kneading is where the magic happens! This process develops gluten, which will give your mini pizza buns their fluffy texture.
Prepare the filling
While the dough is resting and rising, you can create your delicious filling. Here’s a quick idea:
- 1 cup (150 g) of shredded mozzarella cheese
- ½ cup (75 g) of turkey bacon or chicken ham, chopped
- ½ cup (75 g) of chopped bell peppers
- ½ cup (75 g) of pizza sauce for dipping
Simply mix these ingredients in a bowl. Feel free to get creative with your filling! Adding spinach or different types of cheese can elevate the flavors.
Form the mini pizza buns
With your dough ready and filling prepared, it’s time to assemble those mini pizza buns.
- Divide your dough into 12 equal portions.
- Roll each piece into a small circle.
- Place about a tablespoon of filling in the center of each circle.
- Fold the dough over the filling and pinch to seal, ensuring no filling escapes.
It might seem tricky at first, but with a little practice, you'll become a pro!
Let them rise
After forming the buns, let them rise for about 30-45 minutes in a warm place.
- Cover the buns with a kitchen towel, which helps retain moisture.
- They should double in size, indicating that the yeast is doing its job.
Have patience during this step; the risings will make your mini pizza buns fluffy and delightful.
Bake the mini pizza buns
Preheat your oven to 375°F (190°C). Once the mini pizza buns have risen, place them on a baking sheet lined with parchment paper. Here’s the final touch before baking:
- Brush the tops with an egg wash (1 beaten egg mixed with a tablespoon of water) for a golden finish.
- Bake for 15-20 minutes, or until they are golden brown.
Once they’re out of the oven, let them cool slightly before indulging. Trust me; you won’t be able to resist their warm, cheesy goodness!
With these steps, you’re all set to enjoy homemade mini pizza buns that are perfect as snacks or party appetizers. Don’t forget to serve them with a side of marinara sauce for dipping. Happy baking!
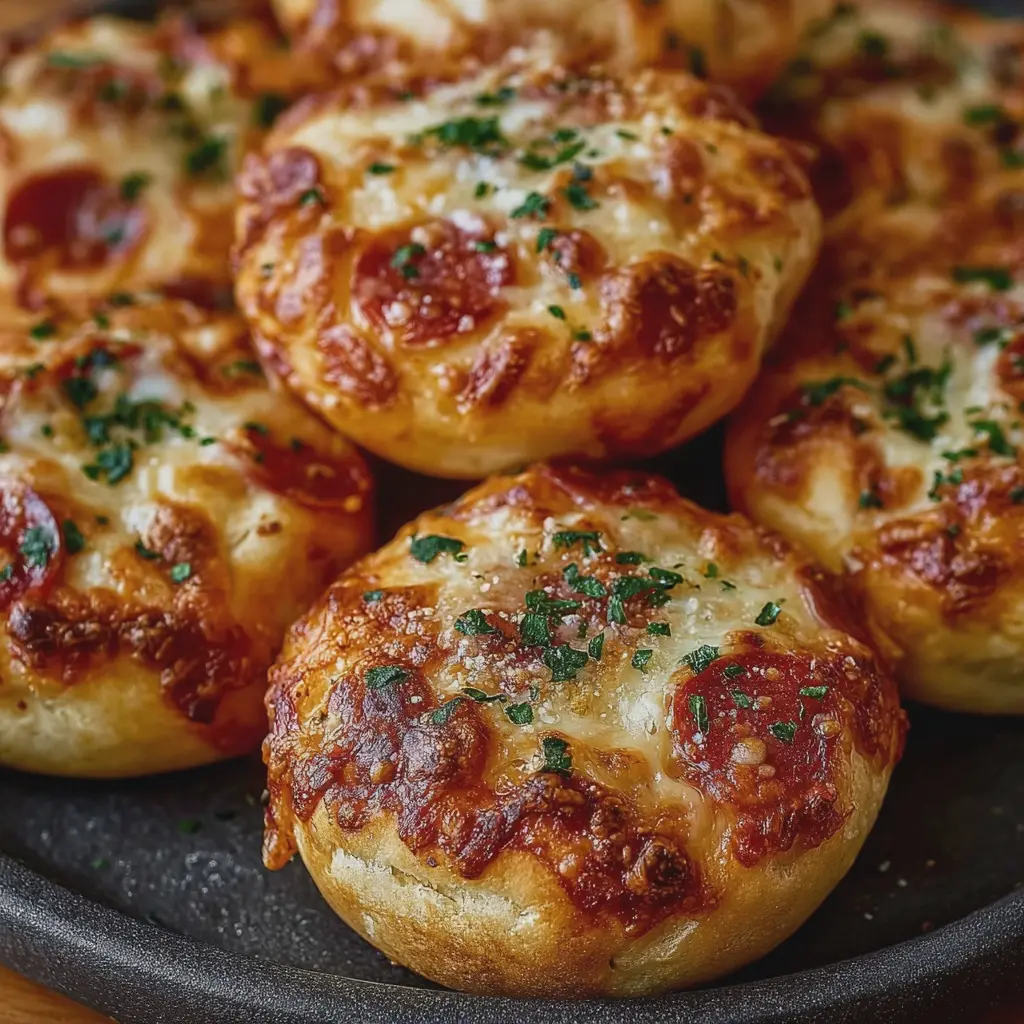
Variations on Mini Pizza Buns
When it comes to mini pizza buns, the possibilities are endless! Whether you're a vegetarian or a meat lover, there’s a delightful twist for everyone. Let’s explore some delicious variations!
Vegetarian Mini Pizza Buns
For those looking to enjoy a meat-free option, vegetarian mini pizza buns are a real treat. Start with a base of marinara sauce and layer on your favorite vegetables. Think zucchini, bell peppers, and spinach. Adding a sprinkle of mozzarella or a vegan cheese alternative elevates these buns to new heights. You might even consider a touch of pesto for a unique flavor explosion! Not only are they delicious, but they also pack a nutritious punch. According to Healthline, including more vegetables in your diet can aid digestion and boost your immune system.
Mini Pizza Buns with Different Meats
If you’re all about the protein, you can easily customize your mini pizza buns to include a variety of meats. Think about classic options like:
- Turkey Bacon: It adds a savory, smoky flavor while keeping it lean.
- Chicken Ham: A delightful alternative, offering a slightly sweet flavor that pairs perfectly with cheese and herbs.
- Beef Pepperoni: For that authentic pizza experience, this adds a satisfying kick.
Mixing and matching these meats can create a flavor profile that’s right at home in your kitchen. Want a spicy kick? Try adding sliced jalapeños along with your meat selections!
By playing around with these various options, you’ll never get bored of your mini pizza buns. So, grab your ingredients, roll up your sleeves, and let your creativity shine in this fun and tasty treat!
Cooking Tips and Notes for Mini Pizza Buns
Troubleshooting Dough Issues
Making mini pizza buns can be a delightful experience, but sometimes you'll encounter dough challenges. If your dough is too sticky, try adding a bit more flour, but be cautious not to overdo it; a little goes a long way. Should your dough feel dry and crumbly, a drizzle of water can help adjust the texture. Need a quick rise? Place the dough in a warm, draft-free area—this can speed up the fermentation process!
Tips for Flavor Enhancement
Elevate your mini pizza buns with some creative flourishes! Consider incorporating herbs like oregano, basil, or garlic powder directly into your dough. You can also experiment with different cheese blends. For instance, mixing mozzarella with provolone or adding some spice from pepper jack creates a delightful flavor profile. Don’t forget to top them with your favorite fillings! Turkey bacon, chicken ham, or even beef crumbles can bring a savory burst. For more flavor inspiration, check out this guide from Serious Eats.
By implementing these tips, you’ll create mini pizza buns that are not only fun to make but also bursting with flavor!

Serving Suggestions for Mini Pizza Buns
Creative dips for pizza buns
Who doesn't love mini pizza buns paired with a delicious dip? Think outside the box! Instead of the usual marinara, try these unique options:
- Garlic Herb Aioli: Creamy and packed with flavor, this dip complements the savory meat and cheese in the buns brilliantly.
- Spicy Ranch Dressing: Perfect for those who enjoy a kick! The zesty flavor will elevate your snacking experience.
- Creamy Spinach Dip: A cool, velvety dip that adds a sophisticated touch to your pizza feast. You can find various recipes online that fit any dietary preference.
These dips not only enhance the flavors but also create an interactive eating experience that’s perfect for gatherings.
Pairing ideas for a full meal
Looking to turn your mini pizza buns into a full meal? Here are some delicious pairing ideas:
-
Fresh Salad: A light, crisp salad filled with seasonal vegetables balances out the richness of the buns.
-
Soup: Pairing these buns with a hearty minestrone or tomato basil soup creates a warm, comforting combo—great for chilly evenings!
-
Fruit Platter: Add some freshness with a colorful assortment of fruits. The sweetness can be a nice contrast to the savory flavors of the pizza buns.
These combinations can make your mini pizza bun experience memorable and satisfying, whether it’s for a cozy night in or a small gathering with friends.
For more inspiration on fun pairings, visit Food Network or BBC Good Food for creative side dishes!
Time Breakdown for Mini Pizza Buns
Preparation Time
Getting started with your mini pizza buns is a breeze! You’ll want to set aside about 15-20 minutes for preparation. This includes mixing your dough and prepping your toppings like turkey bacon and chicken ham.
Rising Time
Patience is key here! Let your dough rise for about 1 hour in a warm place. This is a crucial step for achieving that delightful fluffiness we all love in a good bun.
Baking Time
Once your dough has risen, it’s time to bake. Preheat your oven and slide those delicious mini pizza buns in for 15-20 minutes until they’re golden brown.
Total Time
All in all, you’re looking at roughly 1 hour and 45 minutes from start to finish. With just a bit of time and effort, you’ll be satisfying your cravings with these scrumptious bites. For more tips on dough handling, check articles on sites like King Arthur Baking for expert guidance and resources.
Nutritional Facts for Mini Pizza Buns
Calories per bun
Each mini pizza bun packs approximately 150 calories, making it a flavorful yet satisfying snack option. Perfect for those busy days when you're on the go, these bite-sized treats can keep your energy up without derailing your diet.
Breakdown of key nutrients
These little delights provide more than just calories. Here’s a quick look at what you get per bun:
- Protein: About 5 grams, helping to keep you full longer. Great for post-workout snacking!
- Carbohydrates: Approximately 20 grams. This is your primary source of energy.
- Fats: Around 5 grams, primarily from the cheese and any toppings you choose, such as Turkey Bacon or Chicken Ham.
Using whole-grain flour can boost fiber content, keeping your digestive system happy. Check out this nutrition guide for more insights into healthy eating!
A delicious blend of flavors, mini pizza buns not only satisfy your taste buds but also offer a balanced mix of nutrients that fit seamlessly into your lifestyle. So, ready to snack smarter?
FAQ about Mini Pizza Buns
Can I freeze mini pizza buns?
Absolutely! Freezing mini pizza buns is a fantastic way to enjoy them later. Once they’ve cooled completely, place them in an airtight container or a resealable freezer bag. They can stay fresh for up to three months in the freezer. When you're ready to indulge, simply thaw them overnight in the refrigerator, then reheat them in the oven at 350°F (about 175°C) for 10-15 minutes until warm. It’s easy and convenient—perfect for meal prep!
How do I store them properly?
To keep your mini pizza buns tasting fresh, store them in an airtight container at room temperature for up to two days. If you want to extend their shelf life, you can place them in the refrigerator, where they'll stay good for about four to five days. Just be sure to let them cool down completely after baking before sealing them to avoid condensation, which can lead to sogginess.
What are some good substitutions for the filling?
The great thing about mini pizza buns is how customizable they are! Here are a few delicious substitutions you can try for the filling:
- Cheese: Swap out mozzarella for provolone or goat cheese for a tangy twist.
- Meats: Instead of beef or chicken ham, try using turkey bacon or turkey pepperoni for a lighter option.
- Veggies: Add some chopped bell peppers, onions, or spinach if you’re looking to pack in some extra nutrients.
- Sauces: Instead of tomato sauce, consider using pesto or alfredo sauce for a different flavor profile.
Experimenting with your fillings can turn a good recipe into a great one. Don't be afraid to be creative! For more inspiration and variations, check out this article on pizza trends.
By following these tips and tricks, you’ll ensure your mini pizza buns are delicious, convenient, and enjoyable!
Conclusion on Mini Pizza Buns
Recap of Why They’re a Great Choice
Mini pizza buns are not just a delightful treat; they offer a fantastic way to enjoy pizza flavors in a fun, bite-sized form. Perfect for gatherings, movie nights, or even a quick snack, these buns are incredibly versatile. You can personalize them with your favorite toppings, such as turkey bacon and chicken ham, making them a hit with both family and friends.
Encouragement to Try Making Them at Home
If you’re looking to impress your guests or just want a cozy night in, I encourage you to give these mini pizza buns a try. It’s an easy recipe that allows for creativity in the kitchen. Don’t be afraid to experiment with different ingredients or sauces—maybe a zesty marinara or a creamy garlic dip? The possibilities are endless! Plus, making them at home can be much healthier and more satisfying than store-bought options. Happy cooking!
For more ideas and tips, check out resources like Serious Eats and Food Network.
Print
Mini Pizza Buns: Easy Recipe with Turkey Bacon and Chicken Ham
Delicious mini pizza buns made with turkey bacon and chicken ham, perfect for a quick snack or appetizer.
- Total Time: 35 minutes
- Yield: 12 mini buns
Ingredients
- 1 cup pizza dough
- 4 slices turkey bacon, chopped
- 4 slices chicken ham, diced
- 1 cup mozzarella cheese, shredded
- ½ cup pizza sauce
- 1 teaspoon Italian seasoning
- ½ teaspoon garlic powder
Instructions
- Preheat the oven to 375°F (190°C).
- Roll out the pizza dough on a floured surface.
- Cut the dough into small circles.
- In a bowl, mix together the turkey bacon, chicken ham, mozzarella cheese, pizza sauce, Italian seasoning, and garlic powder.
- Place a spoonful of the filling onto each dough circle.
- Fold the dough over the filling and seal the edges.
- Place the mini buns on a baking sheet lined with parchment paper.
- Bake for 15-20 minutes or until golden brown.
- Serve warm.
Notes
- For extra flavor, brush the buns with melted butter before baking.
- You can use store-bought pizza dough for convenience.
- Prep Time: 15 minutes
- Cook Time: 20 minutes
- Category: Appetizer
- Method: Baking
- Cuisine: Italian
- Diet: Non-Vegetarian
Nutrition
- Serving Size: 2 mini buns
- Calories: 250
- Sugar: 2g
- Sodium: 600mg
- Fat: 15g
- Saturated Fat: 6g
- Unsaturated Fat: 8g
- Trans Fat: 0g
- Carbohydrates: 20g
- Fiber: 1g
- Protein: 12g
- Cholesterol: 40mg