Introduction to Peppermint Bark
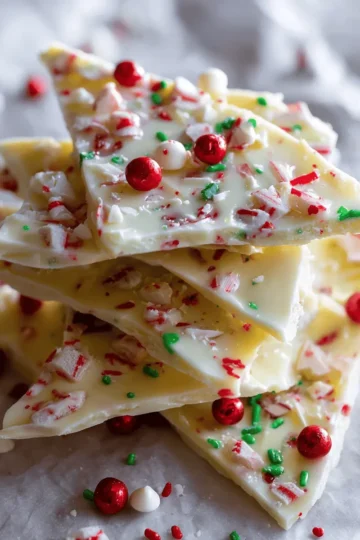
Peppermint bark recipe is a festive and simple holiday treat made with layers of dark chocolate and white chocolate, infused with peppermint extract, and topped with crushed candy canes. This classic Christmas dessert is loved for its rich, creamy texture and refreshing minty crunch. Whether you're making it for a party, as a homemade gift, or just to enjoy with a cup of hot cocoa, this easy peppermint bark recipe is perfect for the holiday season.
With just a few ingredients and no baking required, you can create a delicious, professional-quality peppermint bark in less than 30 minutes. The key to the best peppermint bark lies in using high-quality chocolate and following the right melting techniques. If you've ever had trouble with chocolate seizing or layers separating, this guide will walk you through each step for a flawless result. For expert chocolate-melting tips, check out this guide on preventing chocolate from seizing.
One of the best things about peppermint bark is how effortless it is to prepare at home. Unlike more complicated holiday desserts, this recipe requires minimal ingredients and just a few simple steps. With the right technique, you can achieve perfectly tempered chocolate, which ensures a glossy finish and a satisfying snap when broken into pieces. If you've ever struggled with melting chocolate, understanding the science behind it can help you avoid common mistakes like chocolate seizing or layer separation.
When choosing ingredients, quality matters. The type of chocolate you use significantly impacts the final taste and texture of your peppermint bark. Instead of using generic chocolate chips, consider selecting from the best chocolate brands for baking. High-quality dark chocolate provides a deep, rich cocoa flavor, while premium white chocolate offers a smooth, creamy contrast. Paired with pure peppermint extract and crushed candy canes, the result is a perfectly balanced, festive treat that melts in your mouth.
This homemade peppermint bark recipe is not only simple but also allows for creativity. You can experiment with different chocolate combinations, add sea salt for a sweet-salty contrast, or even make a vegan version with dairy-free chocolate. Whether you're a beginner or an experienced baker, this easy recipe will quickly become a holiday staple in your home.
Ready to make the best peppermint bark? Let’s dive into the step-by-step process, including variations, troubleshooting tips, and creative ways to serve this holiday favorite.

Ingredients Needed for Peppermint Bark
Making homemade peppermint bark is incredibly simple, but the quality of your ingredients makes all the difference. Using the right combination of chocolate, peppermint extract, and crushed candy canes ensures a perfect balance of flavors and textures. Here’s everything you need to make this festive treat.
Essential Ingredients
To create the classic peppermint bark, you’ll need:
- Dark chocolate – Choose a high-quality semi-sweet or bittersweet chocolate (60-70% cacao) for a deep, rich flavor. Avoid chocolate chips, as they contain stabilizers that prevent smooth melting.
- White chocolate – A creamy, high-quality white chocolate is essential for the signature layered look and sweet contrast to the dark chocolate.
- Peppermint extract – A few drops of pure peppermint extract give this treat its signature minty flavor. Avoid artificial peppermint flavoring, which can taste overly harsh or chemical-like.
- Crushed candy canes or peppermint candies – Adds a festive crunch and extra peppermint kick.
If you’re unsure which chocolate brand to use, check out this guide on the best chocolate for baking to find options that melt well and deliver the best taste.
Optional Add-Ins for a Unique Twist
If you want to personalize your peppermint bark, consider adding:
- Nuts – Sliced almonds or walnuts add crunch and richness.
- Sea salt – A sprinkle of flaky sea salt balances the sweetness.
- Different types of chocolate – Try milk chocolate, ruby chocolate, or caramelized white chocolate for a unique twist.
Choosing the Best Peppermint Extract and Candy Canes
Not all peppermint extracts are created equal. Look for one that contains only peppermint oil and alcohol—this ensures a pure, fresh flavor. Some extracts include artificial additives, which can taste overpowering.
For candy canes, opt for ones made with real peppermint oil rather than synthetic flavoring. Organic or naturally flavored candy canes tend to have a smoother, more authentic taste. If you’re curious about the science behind melting and working with chocolate, check out this guide on preventing chocolate from seizing to ensure a flawless texture.
By selecting the highest quality ingredients, you’ll create a peppermint bark that’s not only visually stunning but also rich in flavor and texture.
Equipment & Preparation for Making Peppermint Bark
Before you begin making peppermint bark, having the right tools and preparation in place will ensure a smooth and enjoyable process. This simple treat requires minimal equipment, but using the right kitchen tools can help you achieve the best results.
Essential Kitchen Tools
To make perfectly layered peppermint bark, you’ll need:
- Baking sheet – A sturdy, rimmed sheet ensures an even chocolate layer and prevents any spillage.
- Parchment paper – Prevents the chocolate from sticking to the baking sheet and makes cleanup easier.
- Double boiler or microwave-safe bowl – Melting chocolate correctly is crucial. A double boiler allows for gentle heating, preventing the chocolate from burning. Alternatively, a microwave-safe bowl works well if you follow proper melting techniques. Learn how to melt chocolate without seizing to ensure a smooth consistency.
- Spatula – Helps spread the melted chocolate evenly across the baking sheet for a uniform thickness.
Preparing the Candy Canes
The signature crunch of peppermint bark comes from crushed candy canes or peppermint candies. There are a few ways to crush them effectively:
- Rolling Pin Method – Place the candy canes in a sealed plastic bag and gently crush them using a rolling pin. This keeps the mess contained and allows control over the size of the pieces.
- Food Processor – For a finer, more uniform crush, pulse the peppermint candies a few times in a food processor. Be careful not to over-process, as you want small chunks, not powder.
- Mortar and Pestle – This is a great way to achieve different textures, from fine dust to small chunks, for a visually appealing topping.
When selecting candy canes, choose high-quality ones made with real peppermint oil for the best flavor. For premium ingredient recommendations, check out the best chocolate brands for baking, which will enhance the richness of your bark.
By setting up your tools and ingredients in advance, you’ll ensure a seamless process, resulting in a beautiful and delicious homemade peppermint bark.

Step-by-Step Guide to Making Peppermint Bark
Creating peppermint bark is a simple process, but following the right techniques ensures a smooth, glossy finish and the perfect balance of flavors. Below is a detailed step-by-step guide to help you achieve professional-quality peppermint bark at home.
Step 1: Melting the Dark Chocolate
Properly melting dark chocolate is crucial for a smooth and even layer. There are two main methods:
- Microwave Method
- Place chopped dark chocolate or high-quality chocolate chips in a microwave-safe bowl.
- Heat in 30-second intervals, stirring between each session, until fully melted.
- Be careful not to overheat, as chocolate can seize when exposed to too much heat.
- Double Boiler Method
- Fill a saucepan with a few inches of water and bring to a gentle simmer.
- Place a heatproof bowl on top, ensuring it doesn’t touch the water.
- Stir the chocolate constantly until melted and smooth.
Tip: Chocolate seizing occurs when water or excessive heat causes it to clump. To avoid this, use dry utensils and never allow water to splash into the chocolate. For more on proper chocolate melting techniques, check out this guide on chocolate tempering.
Step 2: Spreading and Setting the Dark Chocolate Layer
Once melted, pour the dark chocolate onto a parchment-lined baking sheet and spread it evenly with a spatula.
- Ideal Thickness: Aim for about ¼ inch thick to ensure a balanced bite.
- Cooling Options:
- Fridge: Speeds up the setting process (~15 minutes) but can cause chocolate bloom (white streaks).
- Room Temperature: Takes longer (~30 minutes) but results in a smoother texture.
Step 3: Melting and Adding White Chocolate
Melt white chocolate using the same method as the dark chocolate. Since white chocolate is more sensitive to heat, stir frequently to prevent burning.
- Once melted, stir in ½ teaspoon of peppermint extract for added flavor.
- Pour the white chocolate over the set dark chocolate layer and smooth it out with a spatula.
Step 4: Topping with Crushed Peppermint
Before the white chocolate hardens, immediately sprinkle crushed candy canes or peppermint candies on top.
- Even Distribution: Hold the bowl about 6 inches above the chocolate for a balanced sprinkle.
- Ensuring It Sticks: Lightly press the peppermint pieces into the white chocolate to prevent them from falling off once set.
For the best results, use high-quality candy canes made with real peppermint oil. If you're unsure about which brands to choose, check out this guide on the best chocolate for baking.
Step 5: Setting, Breaking, and Storing
- Setting Time: Allow the peppermint bark to set fully before breaking it into pieces. You can:
- Refrigerate for about 30 minutes for faster setting.
- Let it sit at room temperature for 1-2 hours for a better texture.
- Breaking Into Pieces:
- For uniform pieces, use a sharp knife.
- For a more rustic look, use your hands to snap it into irregular shards.
- Proper Storage:
- Store in an airtight container at room temperature for up to 2 weeks.
- If refrigerated, keep it sealed to prevent moisture from softening the chocolate.
By following these steps, you’ll achieve a peppermint bark that is both visually stunning and delicious.
Variations of Peppermint Bark
While classic peppermint bark is made with layers of dark chocolate, white chocolate, and crushed peppermint, there are many ways to customize this festive treat to suit different tastes and dietary preferences. Here are some delicious variations to try.
Classic Peppermint Bark vs. Flavored Variations
The traditional peppermint bark features a rich dark chocolate base, a creamy white chocolate layer, and a topping of crushed candy canes. But if you’re looking for something different, these flavor variations offer unique twists:
- Dark Chocolate-Only Version
- Skip the white chocolate and go for a full dark chocolate bark for a deeper, more intense cocoa flavor.
- Sprinkle crushed peppermint directly onto the dark chocolate before it sets.
- This is a great option for those who prefer less sweetness.
- Adding Caramel or Sea Salt
- Drizzle melted caramel over the dark chocolate layer before adding the white chocolate.
- A light sprinkle of flaky sea salt enhances the sweet-and-salty contrast, making the flavors pop.
For tips on choosing the best quality chocolate, check out this guide on the best chocolate brands for baking.
Vegan and Dairy-Free Alternatives
If you're avoiding dairy, making vegan peppermint bark is easy with the right ingredients:
- Use dairy-free dark and white chocolate (made with coconut or oat milk).
- Opt for natural peppermint extract instead of artificially flavored ones.
- Make sure the candy canes don’t contain dairy-based colorings or additives.
Keto or Sugar-Free Peppermint Bark
For a low-carb or sugar-free version:
- Use sugar-free dark chocolate sweetened with stevia or monk fruit.
- Swap white chocolate for a keto-friendly version made with cocoa butter and sugar substitutes.
- Replace crushed candy canes with sugar-free peppermint candies to keep carbs low.
If you're concerned about melting techniques, check out this guide on preventing chocolate from seizing to ensure a smooth finish.
These variations allow you to customize peppermint bark to fit different tastes and dietary needs, making it a versatile and festive treat for everyone to enjoy.
Expert Tips for the Perfect Peppermint Bark
Making peppermint bark is simple, but a few expert techniques can take it from good to great. If you want a professional-quality texture, flavor, and appearance, follow these tips to ensure your chocolate melts smoothly, your layers stay intact, and your peppermint topping stays crisp.
Choose the Best Chocolate for Melting
The quality of chocolate you use will determine the final taste and texture of your peppermint bark. For the best results:
- Use high-quality chocolate bars instead of chocolate chips, which contain stabilizers that prevent smooth melting.
- Look for brands with at least 60% cacao for dark chocolate and high cocoa butter content for white chocolate.
- Check out this guide on the best chocolate brands for baking to find top-tier options that melt perfectly.
How to Avoid Bloomed Chocolate (Grayish Streaks)
One of the biggest issues when making peppermint bark is chocolate bloom, which appears as dull, grayish streaks. This happens when the cocoa butter separates due to improper melting. To prevent it:
- Temper the chocolate properly by melting it slowly and evenly using a double boiler or microwave in short intervals.
- Cool gradually—refrigerating too quickly can cause condensation, leading to bloom.
- Use fresh chocolate—older chocolate is more likely to bloom due to changes in fat structure.
If you’re unfamiliar with chocolate tempering, check out this guide on preventing chocolate from seizing to ensure a smooth, glossy finish.
Keeping Layers from Separating
If your white chocolate layer separates from the dark chocolate when breaking the bark, it’s likely due to improper layering. Here’s how to prevent it:
- Let the dark chocolate cool slightly before adding the white chocolate—but not fully set, as this creates a weak bond.
- Spread the white chocolate gently with a spatula instead of pouring it too forcefully, which can disrupt the first layer.
- Press the peppermint topping lightly to help all layers adhere together.
Achieving the Perfect Peppermint-to-Chocolate Ratio
Too much peppermint can overwhelm the chocolate, while too little may leave it lacking in flavor. For a balanced bite:
- Use ½ teaspoon of peppermint extract per 12 ounces of chocolate—a little goes a long way.
- Sprinkle about ¼ cup of crushed peppermint candies over the top layer for the perfect crunch.
- Avoid over-crushing the candy canes—leave a mix of fine dust and small chunks for texture.
By following these expert tips, you’ll create peppermint bark that is beautifully layered, full of flavor, and has the perfect snap with every bite.

Common Mistakes and How to Fix Them
Even though peppermint bark is simple to make, a few common mistakes can ruin the texture and appearance. Below are the most frequent issues and how to fix them to ensure your chocolate is smooth, your layers hold together, and your peppermint stays crisp.
1. Chocolate Seizing and How to Prevent It
Chocolate seizing happens when even a tiny amount of water comes into contact with melted chocolate, causing it to clump into a grainy, stiff mess.
How to Fix It:
- Use dry utensils and bowls—any moisture can trigger seizing.
- Melt slowly over low heat, stirring frequently.
- If it seizes, try stirring in 1 teaspoon of neutral oil (like coconut oil) to help smooth it out.
- Learn more about avoiding seizing with this guide on chocolate melting.
2. White Chocolate Not Melting Properly
White chocolate is more delicate than dark chocolate and can burn easily, leading to a lumpy or thick texture.
How to Fix It:
- Use high-quality white chocolate with a high cocoa butter content.
- Melt in short intervals (15-20 seconds) in the microwave, stirring in between.
- Avoid overheating—white chocolate burns at lower temperatures than dark chocolate.
- If it becomes too thick, stir in ½ teaspoon of coconut oil to loosen the texture.
3. Peppermint Pieces Melting Into the Chocolate
If crushed candy canes melt into the white chocolate, they can create a sticky mess instead of a crunchy topping.
How to Fix It:
- Let the chocolate cool slightly before sprinkling the peppermint pieces to prevent heat from melting them.
- Use larger candy cane chunks instead of fine dust, which dissolves faster.
- Store peppermint bark properly in a cool, dry place to keep the topping crisp.
4. Bark Becoming Too Brittle or Too Soft
If your peppermint bark snaps too easily or turns out too soft, it’s likely due to improper setting or ingredient issues.
How to Fix It:
- For brittle bark:
- Reduce the thickness of the chocolate layers.
- Avoid storing it in the freezer for too long, as extreme cold can make chocolate overly brittle.
- For soft bark:
- Use high-quality chocolate with a higher cocoa butter content.
- Ensure bark sets at room temperature before refrigerating to maintain structure.
- Store in an airtight container to prevent moisture from softening the chocolate.
By avoiding these mistakes and following proper techniques, you’ll get a perfectly balanced, crunchy, and beautifully layered peppermint bark every time.
Frequently Asked Questions About Peppermint Bark
Making peppermint bark is simple, but many people run into common questions about ingredients, storage, and troubleshooting. Below are answers to the most frequently asked questions to help you perfect this holiday treat.
Can I use chocolate chips instead of bars?
Chocolate chips contain stabilizers that prevent them from melting smoothly, which can lead to a thick or grainy texture. Instead, use high-quality chocolate bars or baking chocolate for a glossy, professional finish. If you're unsure which brand to use, check out this guide on the best chocolate for baking.
How long does peppermint bark last?
Properly stored, peppermint bark can last up to 2 weeks at room temperature in an airtight container. If kept in the refrigerator, it can stay fresh for about 3 weeks.
Can I freeze peppermint bark?
Yes! To freeze peppermint bark:
- Wrap it in parchment paper, then place it in an airtight container.
- Freeze for up to 3 months.
- Let it sit at room temperature for 10-15 minutes before eating to prevent condensation from softening the chocolate.
Why does my peppermint bark separate?
If the white chocolate layer separates from the dark chocolate, it’s usually because:
- The dark chocolate was completely hardened before adding the white layer. Let it cool slightly but remain tacky before layering.
- The white chocolate was spread too forcefully, disrupting the bond.
What can I do if my chocolate seizes?
If your chocolate seizes (turns thick and grainy), try stirring in 1 teaspoon of coconut or vegetable oil to help smooth it out. Learn more about chocolate tempering with this guide on preventing chocolate from seizing.
Can I make peppermint bark without peppermint extract?
Yes! If you prefer a milder flavor, simply increase the amount of crushed candy canes for natural peppermint taste. You can also try mint-flavored chocolate instead of adding extract.
How do I make peppermint bark without dairy?
For a dairy-free version:
- Use vegan chocolate (made with coconut or oat milk).
- Make sure the peppermint extract is alcohol-based, as some contain dairy-based flavoring.
- Check candy cane ingredients for hidden dairy additives.
What’s the best way to gift-wrap homemade peppermint bark?
For a festive presentation:
- Use clear cellophane bags tied with a ribbon.
- Layer pieces in a holiday tin lined with parchment paper.
- Place in a mason jar with a handwritten tag for a personal touch.
For more creative ideas, check out this holiday gift wrapping guide.
With these tips, you’ll be able to store, troubleshoot, and package your peppermint bark like a pro!
Serving, Pairings & External Resources
How to Serve & Pair Peppermint Bark
Peppermint bark is a versatile holiday treat that can be enjoyed in many ways. Whether you’re serving it as a standalone dessert or incorporating it into other recipes, here are the best ways to enjoy it:
- Classic serving style – Break into bite-sized pieces and arrange on a festive platter.
- Pair with warm drinks – The cool, minty flavor of peppermint bark pairs beautifully with:
- Hot cocoa – Stir a piece into a steaming mug for a rich, mint-infused drink.
- Coffee – Enjoy alongside a cup of dark roast or holiday-spiced latte.
- Peppermint tea – A perfect match for those who love an extra minty kick.
- Use in recipes – Crushed peppermint bark makes a delicious topping for:
- Brownies – Sprinkle over freshly baked brownies for a holiday twist.
- Ice cream – Add to vanilla or chocolate ice cream for a crunchy texture.
- Cookies – Mix into cookie dough for a festive peppermint-chocolate flavor.
For more creative ways to incorporate peppermint bark into holiday recipes, explore this collection of holiday baking ideas.
Additional Resources & References
If you’re looking for high-quality ingredients, professional kitchen tools, or more holiday recipes, check out these helpful resources:
- Where to Buy the Best Chocolate – Learn about the best chocolate brands for baking to elevate your peppermint bark.
- Chocolate Melting & Troubleshooting – Get expert advice on preventing seizing and achieving a smooth, glossy finish with this chocolate melting guide.
- Essential Kitchen Tools – A good double boiler, silicone spatula, and parchment paper make all the difference when making peppermint bark.
With these resources, you’ll have everything you need to create, serve, and gift peppermint bark like a pro!
Print
Easy Homemade Peppermint Bark Recipe
A simple and festive holiday treat made with layers of dark and white chocolate, infused with peppermint, and topped with crushed candy canes.
- Total Time: 20 mins
- Yield: 12 servings
Ingredients
- 12 oz dark chocolate (semi-sweet or bittersweet)
- 12 oz white chocolate
- ½ teaspoon peppermint extract
- ½ cup crushed candy canes or peppermint candies
Instructions
1. Prepare the Chocolate: Melt the dark chocolate using a double boiler or microwave in 30-second intervals, stirring between each.
2. Spread and Cool: Pour the melted dark chocolate onto a parchment-lined baking sheet, spreading evenly. Let it cool slightly.
3. Melt White Chocolate: Using the same method, melt the white chocolate and mix in peppermint extract.
4. Layer & Sprinkle: Pour the white chocolate over the dark chocolate layer and spread evenly. Immediately sprinkle crushed candy canes on top.
5. Set and Break: Let the bark set at room temperature for 1-2 hours or 30 minutes in the fridge. Once firm, break into pieces and enjoy!
Notes
- Use high-quality chocolate for the best results.
- Avoid overheating white chocolate to prevent burning.
- For a vegan version, use dairy-free chocolate and ensure candy canes are gelatin-free.
- Store in an airtight container for up to 2 weeks.
- Prep Time: 10 mins
- Cook Time: 10 mins
- Category: Dessert
- Method: No-bake
- Cuisine: American
- Diet: Vegetarian
Nutrition
- Calories: 220 kcal
- Sugar: 20g
- Sodium: 20mg
- Fat: 12g
- Saturated Fat: 7g
- Carbohydrates: 25g
- Fiber: 2g
- Protein: 2g
- Cholesterol: 5mg